Introducing the Raspberry Pi 5 pinout, specifications, and pricing of this groundbreaking device. With its unparalleled versatility and power, the Raspberry Pi 5 is a true game-changer in the world of single-board computers. Whether you’re a tech enthusiast, an educator, or an entrepreneur, this compact and affordable device has something for everyone.
Featuring an upgraded processor, increased RAM, and enhanced connectivity options, the Raspberry Pi 5 delivers lightning-fast performance and seamless multitasking capabilities. From running demanding applications to exploring the vast possibilities of Internet of Things (IoT) projects, this little marvel can do it all.

In this comprehensive guide, we’ll delve into the detailed specifications of the Raspberry Pi 5, unravel its intricate pin diagram, and explore its pricing options to help you make an informed decision. Whether you’re a seasoned Raspberry Pi user or a curious beginner, this guide will provide you with all the information you need to harness the full potential of this remarkable device.
Get ready to revolutionize your projects and unlock endless possibilities with the Raspberry Pi 5. Let’s dive in!
Specifications of Raspberry Pi 5
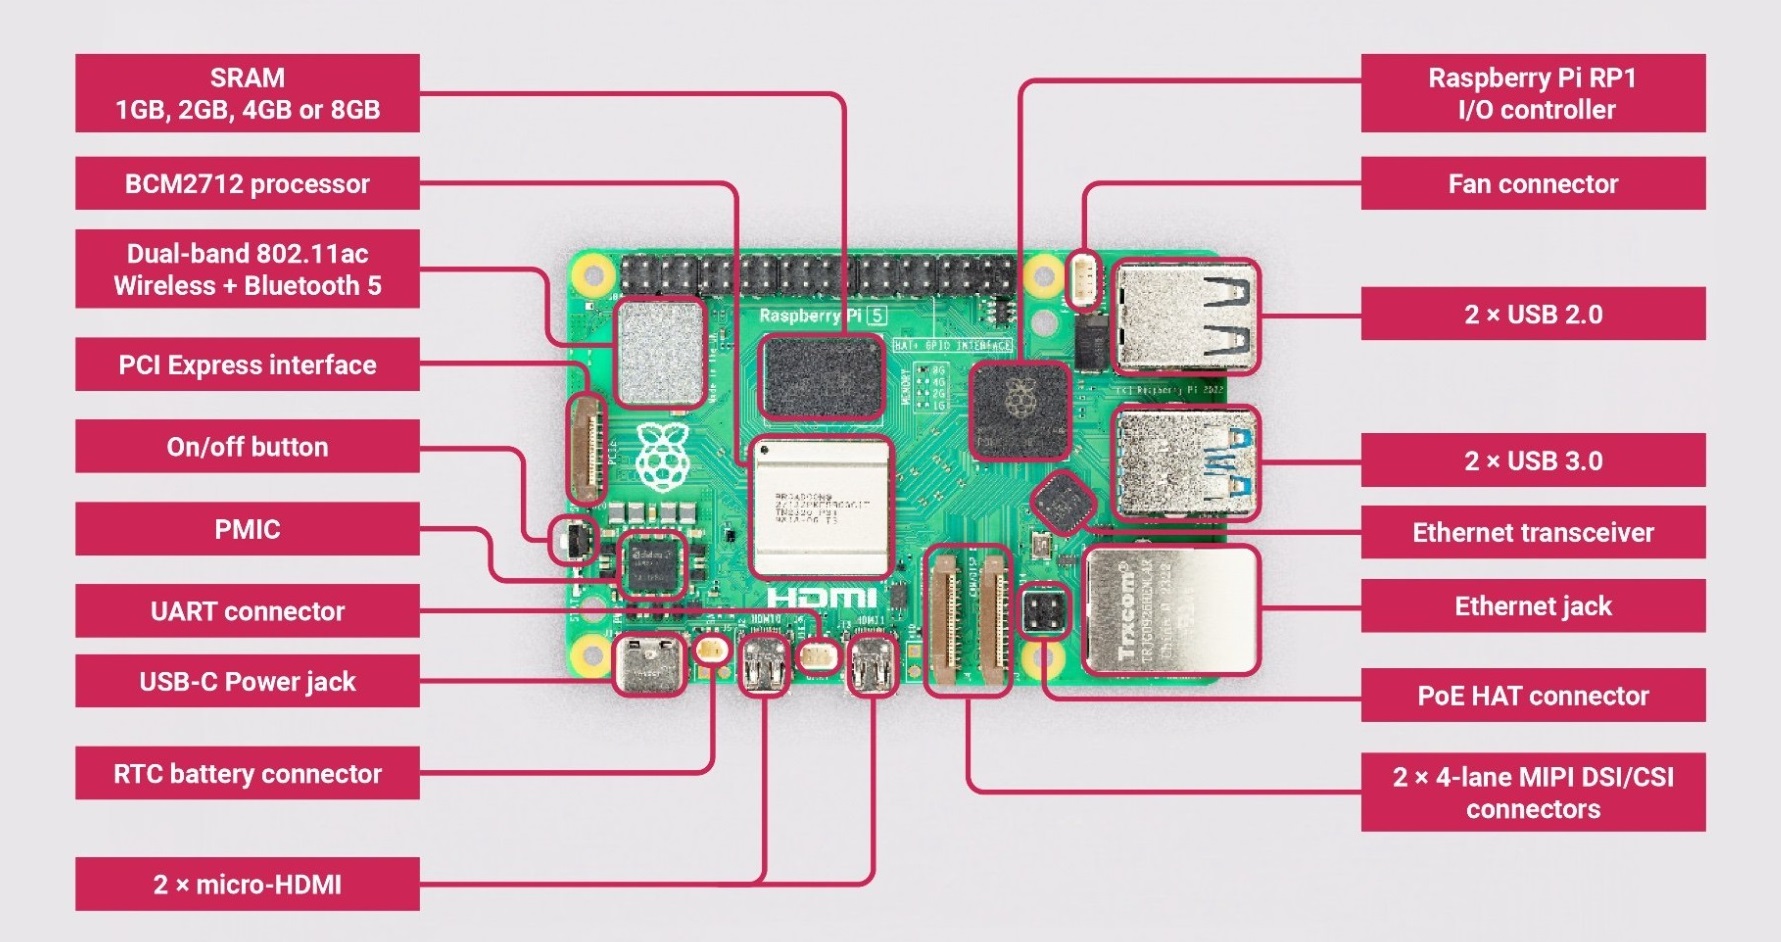
- Broadcom BCM2712 2.4GHz quad-core 64-bit Arm Cortex-A76 CPU, with cryptography extensions, 512KB per-core L2 caches and a 2MB shared L3 cache
- VideoCore VII GPU, supporting OpenGL ES 3.1, Vulkan 1.2
- Dual 4Kp60 HDMI® display output with HDR support
- 4Kp60 HEVC decoder
- LPDDR4X-4267 SDRAM (4GB and 8GB SKUs available at launch)
- Dual-band 802.11ac Wi-Fi®
- Bluetooth 5.0 / Bluetooth Low Energy (BLE)
- microSD card slot, with support for high-speed SDR104 mode
- 2 × USB 3.0 ports, supporting simultaneous 5Gbps operation
- 2 × USB 2.0 ports
- Gigabit Ethernet, with PoE+ support (requires separate PoE+ HAT)
- 2 × 4-lane MIPI camera/display transceivers
- PCIe 2.0 x1 interface for fast peripherals (requires separate M.2 HAT or other adapter)
- 5V/5A DC power via USB-C, with Power Delivery support
- Raspberry Pi standard 40-pin header
- Real-time clock (RTC), powered from external battery
- Power button
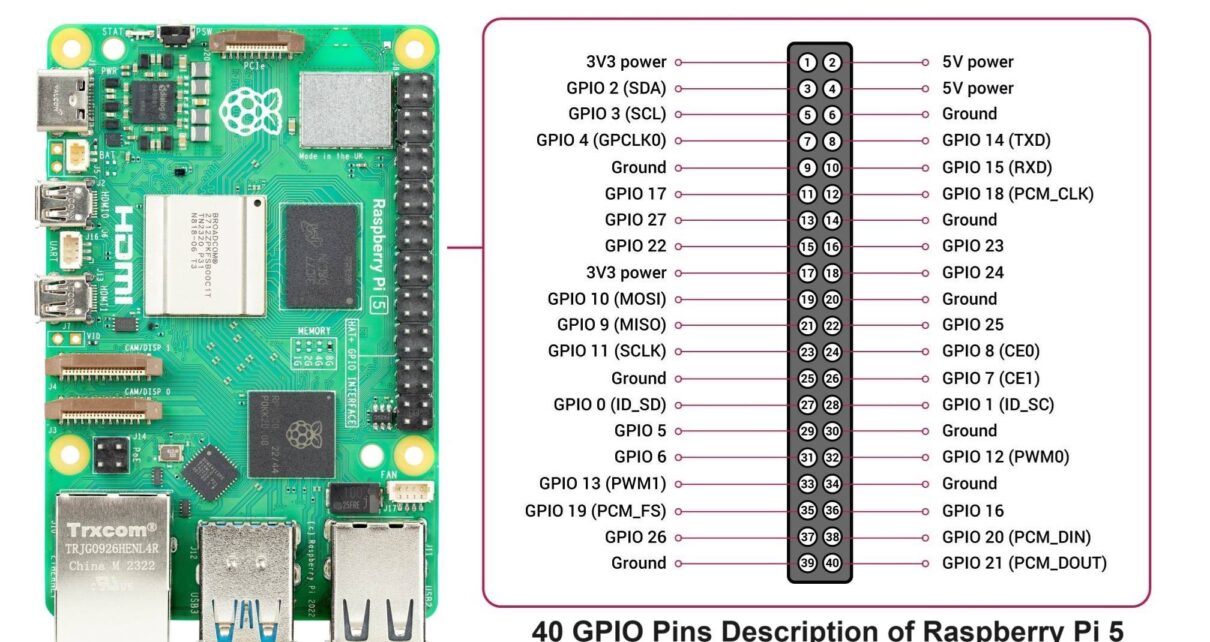
Raspberry Pi 5 Pinout
The Raspberry Pi 5 has a 40-pin GPIO header, which is the same GPIO header from Raspberry Pi 4. You can use the GPIO header to connect a variety of sensors, actuators, and other electronic devices to the Raspberry Pi. The table below shows the GPIO pinout for the Raspberry Pi 5.
| Pin | Name | Function |
|---|---|---|
| 1 | 3.3V | 3.3V power supply |
| 2 | 5V | 5V power supply |
| 3 | GPIO 2 | I2C1 SDA (Data Line) |
| 4 | 5V | 5V power supply |
| 5 | GPIO 3 | I2C1 SCL (Clock Line) |
| 6 | Ground | Ground |
| 7 | GPIO 4 | General-purpose input/output |
| 8 | GPIO 14 | UART TXD (Transmit Data) |
| 9 | Ground | Ground |
| 10 | GPIO 15 | UART RXD (Receive Data) |
| 11 | GPIO 17 | General-purpose input/output |
| 12 | GPIO 18 | PCM_CLK (Pulse Code Modulation Clock) |
| 13 | GPIO 27 | General-purpose input/output |
| 14 | Ground | Ground |
| 15 | GPIO 22 | General-purpose input/output |
| 16 | GPIO 23 | General-purpose input/output |
| 17 | 3.3V | 3.3V power supply |
| 18 | GPIO 24 | General-purpose input/output |
| 19 | GPIO 10 | SPI0 MOSI (Master Out, Slave In) |
| 20 | Ground | Ground |
| 21 | GPIO 9 | SPI0 MISO (Master In, Slave Out) |
| 22 | GPIO 25 | General-purpose input/output |
| 23 | GPIO 11 | SPI0 SCLK (Clock Line) |
| 24 | GPIO 8 | SPI0 CE0 (Chip Enable 0) |
| 25 | Ground | Ground |
| 26 | GPIO 7 | SPI0 CE1 (Chip Enable 1) |
| 27 | GPIO 0 | I2C EEPROM Data Line / ID_SD |
| 28 | GPIO 1 | I2C EEPROM Clock Line / ID_SC |
| 29 | GPIO 5 | General-purpose input/output |
| 30 | Ground | Ground |
| 31 | GPIO 6 | General-purpose input/output |
| 32 | GPIO 12 | PWM (Pulse Width Modulation) |
| 33 | GPIO 13 | PWM (Pulse Width Modulation) |
| 34 | Ground | Ground |
| 35 | GPIO 19 | PCM_FS (Frame Sync for Pulse Code Modulation) |
| 36 | GPIO 16 | General-purpose input/output |
| 37 | GPIO 26 | General-purpose input/output |
| 38 | GPIO 20 | PCM_DIN (Data In for Pulse Code Modulation) |
| 39 | Ground | Ground |
| 40 | GPIO 21 | PCM_DOUT (Data Out for Pulse Code Modulation) |
Pricing of Raspberry Pi 5
The Raspberry Pi 5 is available at a competitive price, considering its impressive specifications and capabilities. The exact pricing may vary depending on the region and the retailer, but the Raspberry Pi 5 is expected to be priced around $90 to $120 for the 4GB and 8GB RAM variant. This price point makes the device accessible to a wide range of users, including hobbyists, educators, and professionals.
When comparing the pricing of the Raspberry Pi 5 with other single-board computers in the market, it’s evident that the Raspberry Pi Foundation has maintained its commitment to affordability. The Raspberry Pi 5 offers exceptional value for money, considering its powerful hardware and extensive software support.
Getting started with Raspberry Pi 5 setup and installation guide
Setting up the Raspberry Pi 5 is a straightforward process that can be completed by following a few simple steps. Here’s a step-by-step guide to help you get started:
Prepare the necessary components: To get started, you’ll need a Raspberry Pi 5 board, a power supply, a microSD card, and an HDMI cable. Make sure you have all the required components before proceeding.
Download the operating system: Visit the official Raspberry Pi website and download the latest version of Raspberry Pi OS. You can choose between the full version with a graphical interface or the Lite version for headless setups.
Flash the microSD card: Use a microSD card reader to connect the microSD card to your computer. Use the Raspberry Pi Imager or a similar tool to flash the downloaded operating system onto the microSD card.
Connect peripherals: Connect the HDMI cable to your monitor or TV and plug in a USB keyboard and mouse. Insert the flashed microSD card into the Raspberry Pi 5’s microSD card slot. Finally, connect the power supply to power on the device.
Follow the setup wizard: Once the Raspberry Pi 5 powers on, you’ll be guided through the initial setup process. Follow the on-screen instructions to configure the language, Wi-Fi settings, and other preferences.
Explore and enjoy: After completing the setup, you’re ready to explore the capabilities of the Raspberry Pi 5. Install software, experiment with GPIO connections, and start working on your projects.
Raspberry Pi 5 accessories and add-ons
To enhance the functionality of your Raspberry Pi 5, there are a variety of accessories and add-ons available. Here are some popular options:
Case: A protective case not only keeps your Raspberry Pi 5 safe but also adds a touch of style. Choose a case that provides easy access to ports and GPIO pins.
Display: Connect a compatible display to the HDMI port of the Raspberry Pi 5 to create a compact computer setup. You can choose from various options, including official Raspberry Pi displays and third-party monitors.
Camera module: The Raspberry Pi camera module allows you to capture high-quality images and videos. It’s an excellent addition for projects that involve computer vision, surveillance, or photography.
HATs: Hardware Attached on Top (HAT) boards expand the capabilities of the Raspberry Pi 5 by adding specific functionalities. HATs are available for various applications, including audio, robotics, and sensors.
Storage expansion: While the Raspberry Pi 5 has a microSD card slot for storage, you can expand the storage capacity by connecting an external USB drive or using network-attached storage (NAS) solutions.
These accessories and add-ons provide endless possibilities for customization and expansion, allowing you to tailor the Raspberry Pi 5 to your specific needs.
Tips and tricks to maximize the performance of Raspberry Pi 5
To make the most of your Raspberry Pi 5, here are some tips and tricks to optimize its performance:
Keep the device cool: The Raspberry Pi 5 can generate heat during intensive tasks. To prevent overheating, use a heatsink or a fan to keep the device cool. Proper cooling ensures stable performance and longevity.
Use a high-quality power supply: Ensure that you’re using a reliable power supply that can provide sufficient power to the Raspberry Pi 5. A low-quality power supply can cause stability issues and impact performance.
Optimize software: Regularly update the Raspberry Pi OS and installed software to benefit from bug fixes and performance improvements. Optimize your software setup by disabling unnecessary services and background processes.
Utilize GPIO pins efficiently: Take advantage of the GPIO pins to interface with external devices effectively. Use libraries and frameworks that provide easy access to GPIO functionality, simplifying the development process.
Back up your data: Regularly back up your important files and projects to prevent data loss. Use external storage or cloud services to create reliable backups of your Raspberry Pi 5 data.
By following these tips, you can ensure that your Raspberry Pi 5 performs optimally and delivers exceptional results for your projects.
