In this IOT project, we will see how to make a home automation system using ESP32 and Blynk mobile application. We will use Blynk mobile application to control our ESP32 dev module. This system can work with or without internet. Also, this system can be controlled manually using push buttons.
Components Required for Home Automation System:
- 5V relay module
- ESP32 Dev module
- Push-buttons
- Indicator LED
- 220Ω Resistor
- 5V Power Supply
Bluetooth Controlled Car using ESP32 and Android phone
Circuit Connections of Automation System using ESP32 :

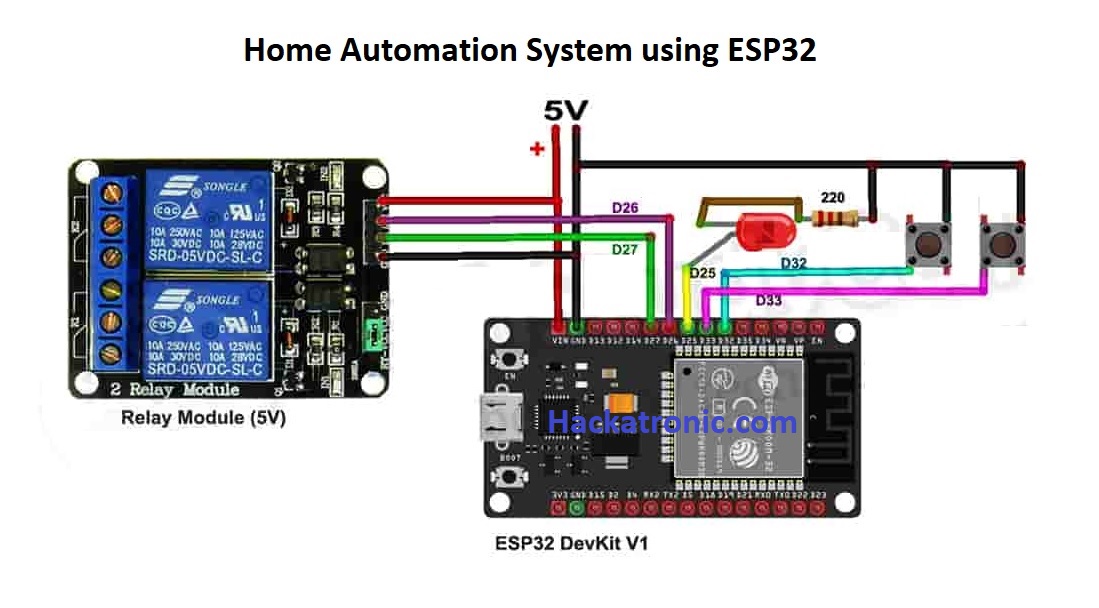
As you can see the circuit connection is very simple. Both the relays are connected to the pin D26 and D27 respectively. We have connected push buttons to pin no D32 and D33. Also to indicate WiFi connection we have added an LED to pin D25.
Coding ESP32 Dev Module:
After connection comes the most challenging part that is programming our ESP32 module. The entire code is divided into sections for your understanding.
Download Blynk library in Arduino IDE, go to sketch then go to include libraries. Flash the code to ESP32 board using Arduino IDE, while flashing pressing the boot button is required.
Home Automation System using ESP32
#include <BlynkSimpleEsp32.h>
BlynkTimer timer;

#define RelayPin1 26   //D26
#define RelayPin2 27  //D27

#define SwitchPin1 32  //D32
#define SwitchPin2 33  //D33

#define wifiLed 25     //D25

#define VPIN_BUTTON_1    V1
#define VPIN_BUTTON_2    V2

int toggleState_1 = 1; //Define integer to remember the toggle state for relay 1
int toggleState_2 = 1; //Define integer to remember the toggle state for relay 2

int wifiFlag = 0;

#define AUTH "AUTH TOKEN"       // You should get Auth Token in the Blynk App.
#define WIFI_SSID "WIFI NAME"   //Enter Wifi Name
#define WIFI_PASS "WIFI PASSWORD"  //Enter wifi Password


void relayOnOff(int relay){

    switch(relay){
      case 1:
             if(toggleState_1 == 1){
              digitalWrite(RelayPin1, LOW); // turn on relay 1
              toggleState_1 = 0;
              Serial.println("Device1 ON");
              }
             else{
              digitalWrite(RelayPin1, HIGH); // turn off relay 1
              toggleState_1 = 1;
              Serial.println("Device1 OFF");
              }
             delay(100);
      break;
      case 2:
             if(toggleState_2 == 1){
              digitalWrite(RelayPin2, LOW); // turn on relay 2
              toggleState_2 = 0;
              Serial.println("Device2 ON");
              }
             else{
              digitalWrite(RelayPin2, HIGH); // turn off relay 2
              toggleState_2 = 1;
              Serial.println("Device2 OFF");
              }
             delay(100);
      break;
      default : break;
      }
  }


void with_internet(){
    //Manual Switch Control
    if (digitalRead(SwitchPin1) == LOW){
      delay(200);
      relayOnOff(1);
      Blynk.virtualWrite(VPIN_BUTTON_1, toggleState_1);   // Update Button Widget
    }
    else if (digitalRead(SwitchPin2) == LOW){
      delay(200);
      relayOnOff(2);
      Blynk.virtualWrite(VPIN_BUTTON_2, toggleState_2);   // Update Button Widget
    }

}
void without_internet(){
    //Manual Switch Control
    if (digitalRead(SwitchPin1) == LOW){
      delay(200);
      relayOnOff(1);
    }
    else if (digitalRead(SwitchPin2) == LOW){
      delay(200);
      relayOnOff(2);
    }

}

BLYNK_CONNECTED() {
  // Request the latest state from the server
  Blynk.syncVirtual(VPIN_BUTTON_1);
  Blynk.syncVirtual(VPIN_BUTTON_2);
}

// When App button is pushed - switch the state

BLYNK_WRITE(VPIN_BUTTON_1) {
  toggleState_1 = param.asInt();
  digitalWrite(RelayPin1, toggleState_1);
}

BLYNK_WRITE(VPIN_BUTTON_2) {
  toggleState_2 = param.asInt();
  digitalWrite(RelayPin2, toggleState_2);
}


void checkBlynkStatus() { // called every 3 seconds by SimpleTimer

  bool isconnected = Blynk.connected();
  if (isconnected == false) {
    wifiFlag = 1;
    digitalWrite(wifiLed, LOW); //Turn off WiFi LED
  }
  if (isconnected == true) {
    wifiFlag = 0;
    digitalWrite(wifiLed, HIGH); //Turn on WiFi LED
  }
}
void setup()
{
  Serial.begin(9600);

  pinMode(RelayPin1, OUTPUT);
  pinMode(RelayPin2, OUTPUT);

  pinMode(wifiLed, OUTPUT);

  pinMode(SwitchPin1, INPUT_PULLUP);
  pinMode(SwitchPin2, INPUT_PULLUP);

  //During Starting all Relays should TURN OFF
  digitalWrite(RelayPin1, toggleState_1);
  digitalWrite(RelayPin2, toggleState_2);

  WiFi.begin(WIFI_SSID, WIFI_PASS);
  timer.setInterval(3000L, checkBlynkStatus);
// check if Blynk server is connected every 3 seconds
  Blynk.config(AUTH);
}

void loop()
{
  if (WiFi.status() != WL_CONNECTED)
  {
    Serial.println("WiFi Not Connected");
  }
  else
  {
    Serial.println("WiFi Connected");
    Blynk.run();
  }

  timer.run(); // Initiates SimpleTimer
  if (wifiFlag == 0)
    with_internet();
  else
    without_internet();
}
Download the code file from here
Configuring Blynk Applications:
Download and install Blynk mobile Application on your phone and follow the steps given below.
Sign up using your email account.

Once you signup you can create your own IOT based project using this application.
Go to the widget section where you get a variety of options to choose like buttons, slider, knob, and various stylized widgets.
Customize your own buttons select the pin numbers, state, color, and button type.
Go to devices select ESP32 Dev Board, connection type Wi-Fi, and get auth token at your email account.
Once your system will get an internet connection you can control it using your mobile device.
Also, you can control it manually via push buttons connected to the system.
You can publish your own App to control your devices, this is a paid service from Blynk.
Conclusion:
With this Home automation system, you can control all of your home appliances like a light bulb fan or any other device which has only ON and OFF states. Overall this is a great project and a good learning experience.


Hi , I am doing a project for my uni on home automation and security using an app on blynk app, but now i don’t understand how to start.
can you help me? thanks
Ok what is your problem?