The ESP32 is a powerful microcontroller with built-in Wi-Fi and Bluetooth, making it an excellent choice for IoT applications. In this project, we will build a weather station using the ESP32 with BMP280 / BME280 air pressure sensor. The BMP280 measures temperature, pressure, and altitude, while the BME280 adds humidity measurement. The sensor data will be accessible via a web server hosted on the ESP32.
Components Required
- ESP32 development board
- BMP280 or BME280 air pressure sensor
- Jumper wires
- Breadboard
- USB cable for programming and power supply
Specifications of BMP280 / BME280 Sensors
Both BMP280 and BME280 are sensors developed by Bosch that measure temperature, atmospheric pressure, and altitude. The BME280 also includes a humidity sensor, making it more versatile for weather monitoring applications.

- BMP280:
- Temperature range: -40 to 85°C
- Pressure range: 300 to 1100 hPa
- Altitude measurement based on pressure
- BME280 (includes all BMP280 features):
- Humidity range: 0 to 100%
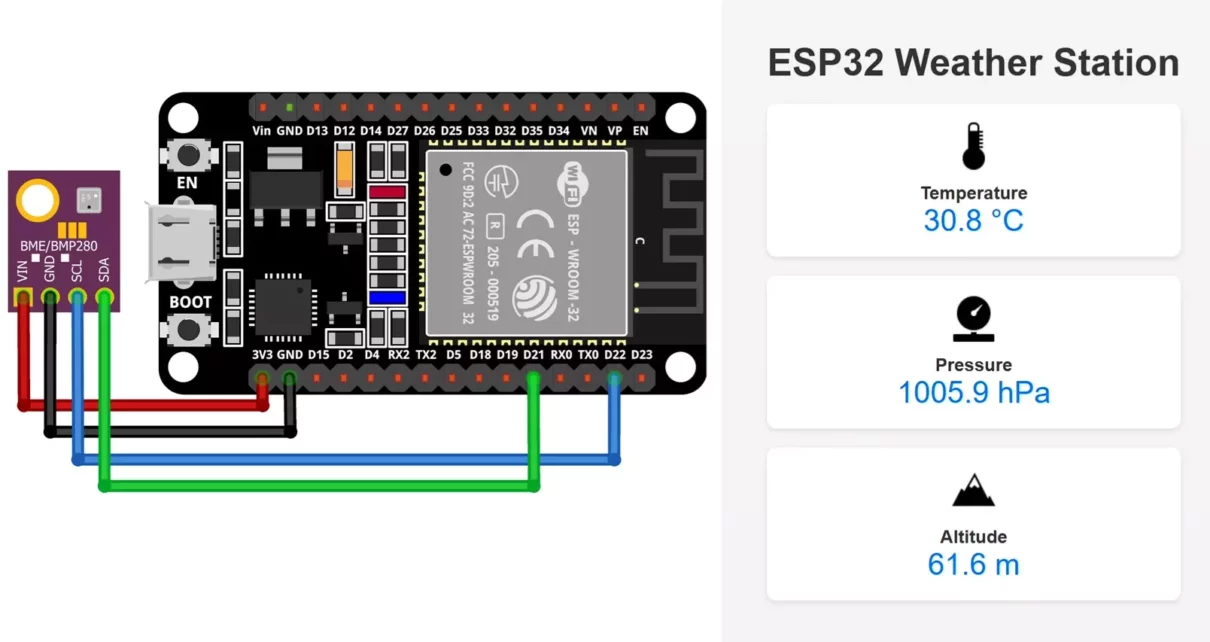
Circuit Diagram: ESP32 with BMP280 / BME280
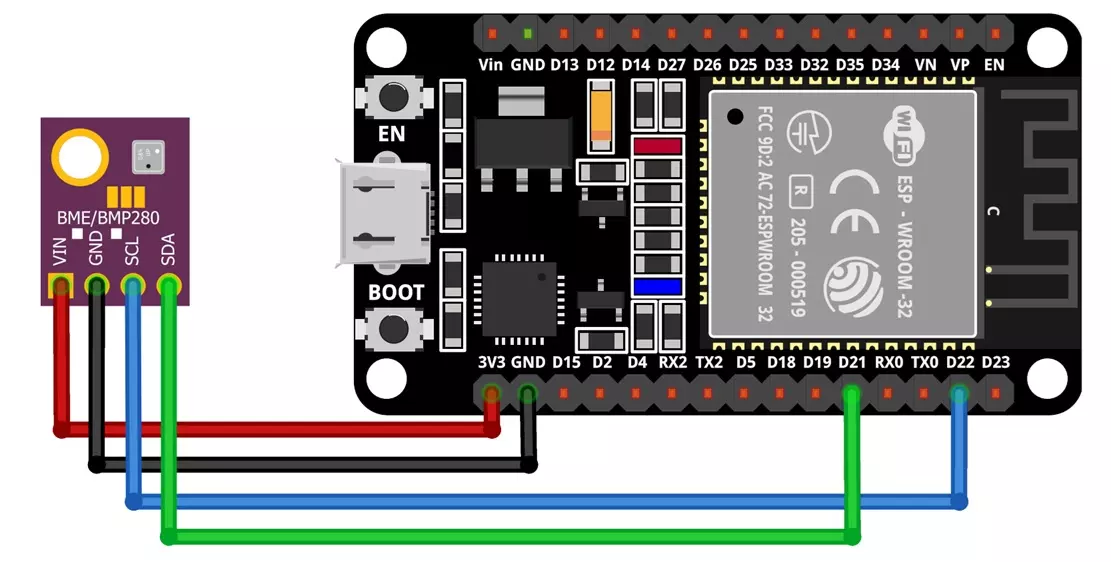
Connect the BMP280 / BME280 sensor to the ESP32 as follows:
| BMP/BME280 Pins | ESP32 Pins |
|---|---|
| VCC | 3.3V |
| GND | GND |
| SDA | GPIO 21 |
| SCL | GPIO 22 |
Working of ESP32 Weather Station
- The ESP32 connects to Wi-Fi.
- The web server starts.
- When a browser accesses the ESP32’s IP address, it:
- Reads BMP280 sensor data.
- Sends an HTML webpage displaying the data.
Setting Up the ESP32 Weather Station
To use the BMP280/BME280 sensor, install the following required libraries in the Arduino IDE:
- Adafruit BMP280 Library (for BMP280)
- Adafruit BME280 Library (for BME280)
- Adafruit Unified Sensor Library
- Wire Library (built-in)
Watch this video for better understanding
Weather Station Program: ESP32 with BMP280 / BME280
Code for BMP280 Sensor
#include <WiFi.h>
#include <Wire.h>
#include <Adafruit_Sensor.h>
#include <Adafruit_BMP280.h>
#define SEALEVELPRESSURE_HPA (1013.25)
Adafruit_BMP280 bmp; // I2C
float temperature, pressure, altitude;
/* Put your SSID & Password */
const char* ssid = "Your SSID"; // Enter SSID here
const char* password = "Your Password"; // Enter Password here
WiFiServer server(80);
void setup() {
Serial.begin(115200);
if (!bmp.begin(0x76)) {
Serial.println("Could not find a valid BMP280 sensor, check wiring!");
while (1);
}
Serial.println("Connecting to Wi-Fi");
WiFi.begin(ssid, password);
while (WiFi.status() != WL_CONNECTED) {
delay(1000);
Serial.print(".");
}
Serial.println("\nWiFi connected");
Serial.print("IP Address: ");
Serial.println(WiFi.localIP());
server.begin();
}
void loop() {
WiFiClient client = server.available();
if (client) {
String request = client.readStringUntil('\r');
client.flush();
temperature = bmp.readTemperature();
pressure = bmp.readPressure() / 100.0F;
altitude = bmp.readAltitude(SEALEVELPRESSURE_HPA);
String html = SendHTML(temperature, pressure, altitude);
client.println("HTTP/1.1 200 OK");
client.println("Content-type:text/html");
client.println();
client.println(html);
client.println();
delay(1);
client.stop();
}
}
String SendHTML(float temperature, float pressure, float altitude) {
String ptr = "<!DOCTYPE html>";
ptr += "<html>";
ptr += "<head>";
ptr += "<title>Smart Weather Monitoring with ESP32 and BMP280 Web Server</title>";
ptr += "<meta name='viewport' content='width=device-width, initial-scale=1.0'>";
ptr += "<style>";
ptr += "body { font-family: Arial, sans-serif; margin: 0; padding: 0; text-align: center; background-color: #f4f4f4; color: #333; }";
ptr += "h1 { font-size: 2.5em; margin: 20px 0; }";
ptr += ".data { margin: 20px auto; padding: 20px; background: #fff; border-radius: 10px; box-shadow: 0 2px 5px rgba(0,0,0,0.1); width: 90%; max-width: 400px; }";
ptr += ".icon { width: 50px; margin: 0 auto 10px; }";
ptr += ".label { font-size: 1.2em; font-weight: bold; }";
ptr += ".value { font-size: 2em; color: #007BFF; }";
ptr += "</style>";
ptr += "</head>";
ptr += "<body>";
ptr += "<h1>ESP32 Weather Station</h1>";
ptr += "<div class='data'>";
ptr += "<img src='https://img.icons8.com/ios-filled/50/temperature.png' alt='Temperature Icon' class='icon'>";
ptr += "<div class='label'>Temperature</div>";
ptr += "<div class='value'>" + String(temperature, 1) + " °C</div>";
ptr += "</div>";
ptr += "<div class='data'>";
ptr += "<img src='https://img.icons8.com/ios-filled/50/pressure.png' alt='Pressure Icon' class='icon'>";
ptr += "<div class='label'>Pressure</div>";
ptr += "<div class='value'>" + String(pressure, 1) + " hPa</div>";
ptr += "</div>";
ptr += "<div class='data'>";
ptr += "<img src='https://img.icons8.com/ios-filled/50/mountain.png' alt='Altitude Icon' class='icon'>";
ptr += "<div class='label'>Altitude</div>";
ptr += "<div class='value'>" + String(altitude, 1) + " m</div>";
ptr += "</div>";
ptr += "</body>";
ptr += "</html>";
return ptr;
}Code Breakdown
1. Libraries and Definitions
These lines include the required libraries and define the sea level pressure constant.
#include
#include
#include
#include

#define SEALEVELPRESSURE_HPA (1013.25)
2. Global Variables and Object Instantiation
This section creates the BMP280 object, declares sensor value variables, sets Wi-Fi credentials, and initializes the HTTP server on port 80.
Adafruit_BMP280 bmp; // I2C

float temperature, pressure, altitude;

/* Put your SSID & Password */
const char* ssid = "Your SSID";
const char* password = "Your Password";

WiFiServer server(80);
3. Setup Function
The setup function initializes serial communication, the BMP280 sensor, connects to Wi‑Fi, and starts the web server.
void setup() {
  Serial.begin(115200);
  if (!bmp.begin(0x76)) {
    Serial.println("Could not find a valid BMP280 sensor, check wiring!");
    while (1);
  }

  Serial.println("Connecting to Wi-Fi");
  WiFi.begin(ssid, password);

  while (WiFi.status() != WL_CONNECTED) {
    delay(1000);
    Serial.print(".");
  }

  Serial.println("\nWiFi connected");
  Serial.print("IP Address: ");
  Serial.println(WiFi.localIP());

  server.begin();
}
4. Loop Function
The loop function waits for a client request, reads sensor data, generates an HTML page with the data, and sends it to the client.
void loop() {
  WiFiClient client = server.available();
  if (client) {
    String request = client.readStringUntil('\r');
    client.flush();

    temperature = bmp.readTemperature();
    pressure = bmp.readPressure() / 100.0F;
    altitude = bmp.readAltitude(SEALEVELPRESSURE_HPA);

    String html = SendHTML(temperature, pressure, altitude);

    client.println("HTTP/1.1 200 OK");
    client.println("Content-type:text/html");
    client.println();
    client.println(html);
    client.println();
    delay(1);
    client.stop();
  }
}
5. SendHTML Function
This function builds and returns an HTML page displaying temperature, pressure, and altitude.
String SendHTML(float temperature, float pressure, float altitude) {
String ptr = "<!DOCTYPE html>";
ptr += "<html>";
ptr += "<head>";
ptr += "<title>Smart Weather Monitoring with ESP32 and BMP280 Web Server</title>";
ptr += "<meta name='viewport' content='width=device-width, initial-scale=1.0'>";
ptr += "<style>";
ptr += "body { font-family: Arial, sans-serif; margin: 0; padding: 0; text-align: center; background-color: #f4f4f4; color: #333; }";
ptr += "h1 { font-size: 2.5em; margin: 20px 0; }";
ptr += ".data { margin: 20px auto; padding: 20px; background: #fff; border-radius: 10px; box-shadow: 0 2px 5px rgba(0,0,0,0.1); width: 90%; max-width: 400px; }";
ptr += ".icon { width: 50px; margin: 0 auto 10px; }";
ptr += ".label { font-size: 1.2em; font-weight: bold; }";
ptr += ".value { font-size: 2em; color: #007BFF; }";
ptr += "</style>";
ptr += "</head>";
ptr += "<body>";
ptr += "<h1>ESP32 Weather Station</h1>";
ptr += "<div class='data'>";
ptr += "<img src='https://img.icons8.com/ios-filled/50/temperature.png' alt='Temperature Icon' class='icon'>";
ptr += "<div class='label'>Temperature</div>";
ptr += "<div class='value'>" + String(temperature, 1) + " °C</div>";
ptr += "</div>";
ptr += "<div class='data'>";
ptr += "<img src='https://img.icons8.com/ios-filled/50/pressure.png' alt='Pressure Icon' class='icon'>";
ptr += "<div class='label'>Pressure</div>";
ptr += "<div class='value'>" + String(pressure, 1) + " hPa</div>";
ptr += "</div>";
ptr += "<div class='data'>";
ptr += "<img src='https://img.icons8.com/ios-filled/50/mountain.png' alt='Altitude Icon' class='icon'>";
ptr += "<div class='label'>Altitude</div>";
ptr += "<div class='value'>" + String(altitude, 1) + " m</div>";
ptr += "</div>";
ptr += "</body>";
ptr += "</html>";
return ptr;
}Code for BME280 Sensor
There is an addition of humidity value in BME280 sensor and everything is same.
#include <WiFi.h> #include <Wire.h> #include <Adafruit_Sensor.h> #include <Adafruit_BME280.h> #define SEALEVELPRESSURE_HPA (1013.25) Adafruit_BME280 bme; // I2C float temperature, pressure, altitude, humidity; /* Put your SSID & Password */ const char* ssid = "Your SSID"; // Enter SSID here const char* password = "Your Password"; // Enter Password here WiFiServer server(80); void setup() { Serial.begin(115200); if (!bme.begin(0x76)) { Serial.println("Could not find a valid BME280 sensor, check wiring!"); while (1); } Serial.println("Connecting to Wi-Fi"); WiFi.begin(ssid, password); while (WiFi.status() != WL_CONNECTED) { delay(1000); Serial.print("."); } Serial.println("\nWiFi connected"); Serial.print("IP Address: "); Serial.println(WiFi.localIP()); server.begin(); } void loop() { WiFiClient client = server.available(); if (client) { String request = client.readStringUntil('\r'); client.flush(); temperature = bme.readTemperature(); pressure = bme.readPressure() / 100.0F; altitude = bme.readAltitude(SEALEVELPRESSURE_HPA); humidity = bme.readHumidity(); String html = SendHTML(temperature, pressure, altitude, humidity); client.println("HTTP/1.1 200 OK"); client.println("Content-type:text/html"); client.println(); client.println(html); client.println(); delay(1); client.stop(); } } String SendHTML(float temperature, float pressure, float altitude, float humidity) { String ptr = "<!DOCTYPE html>"; ptr += "<html>"; ptr += "<head>"; ptr += "<title>Smart Weather Monitoring with ESP32 and BME280 Web Server</title>"; ptr += "<meta name='viewport' content='width=device-width, initial-scale=1.0'>"; ptr += "<style>"; ptr += "body { font-family: Arial, sans-serif; margin: 0; padding: 0; text-align: center; background-color: #f4f4f4; color: #333; }"; ptr += "h1 { font-size: 2.5em; margin: 20px 0; }"; ptr += ".data { margin: 20px auto; padding: 20px; background: #fff; border-radius: 10px; box-shadow: 0 2px 5px rgba(0,0,0,0.1); width: 90%; max-width: 400px; }"; ptr += ".icon { width: 50px; margin: 0 auto 10px; }"; ptr += ".label { font-size: 1.2em; font-weight: bold; }"; ptr += ".value { font-size: 2em; color: #007BFF; }"; ptr += "</style>"; ptr += "</head>"; ptr += "<body>"; ptr += "<h1>ESP32 Weather Station</h1>"; ptr += "<div class='data'>"; ptr += "<img src='https://img.icons8.com/ios-filled/50/temperature.png' alt='Temperature Icon' class='icon'>"; ptr += "<div class='label'>Temperature</div>"; ptr += "<div class='value'>" + String(temperature, 1) + " °C</div>"; ptr += "</div>"; ptr += "<div class='data'>"; ptr += "<img src='https://img.icons8.com/ios-filled/50/pressure.png' alt='Pressure Icon' class='icon'>"; ptr += "<div class='label'>Pressure</div>"; ptr += "<div class='value'>" + String(pressure, 1) + " hPa</div>"; ptr += "</div>"; ptr += "<div class='data'>"; ptr += "<img src='https://img.icons8.com/ios-filled/50/mountain.png' alt='Altitude Icon' class='icon'>"; ptr += "<div class='label'>Altitude</div>"; ptr += "<div class='value'>" + String(altitude, 1) + " m</div>"; ptr += "</div>"; ptr += "<div class='data'>"; ptr += "<img src='https://img.icons8.com/ios-filled/50/humidity.png' alt='Humidity Icon' class='icon'>"; ptr += "<div class='label'>Humidity</div>"; ptr += "<div class='value'>" + String(humidity, 1) + " %</div>"; ptr += "</div>"; ptr += "</body>"; ptr += "</html>"; return ptr; }
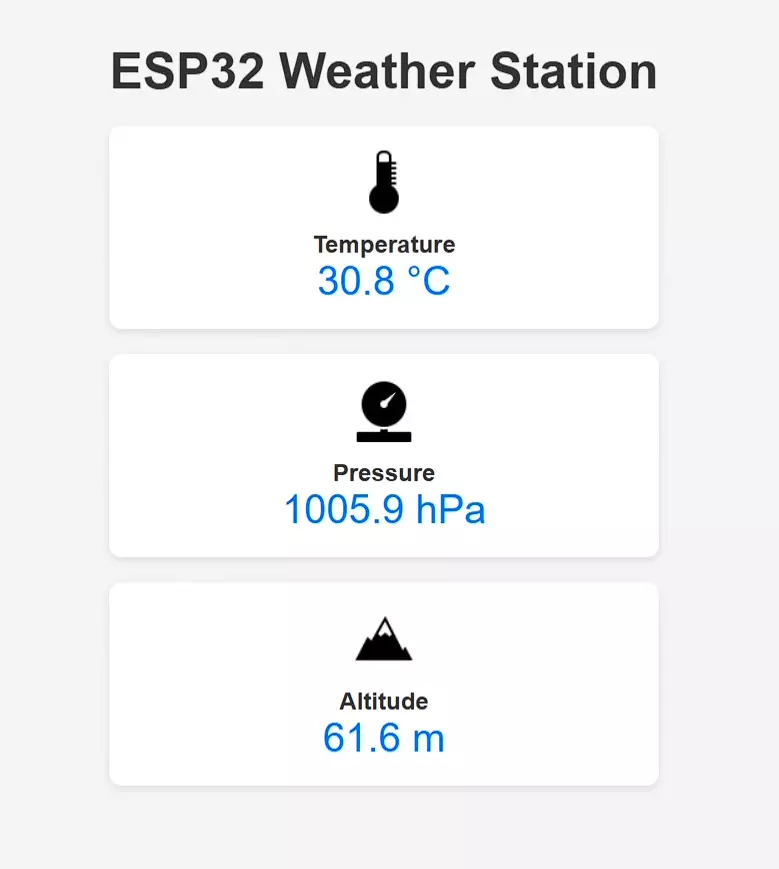
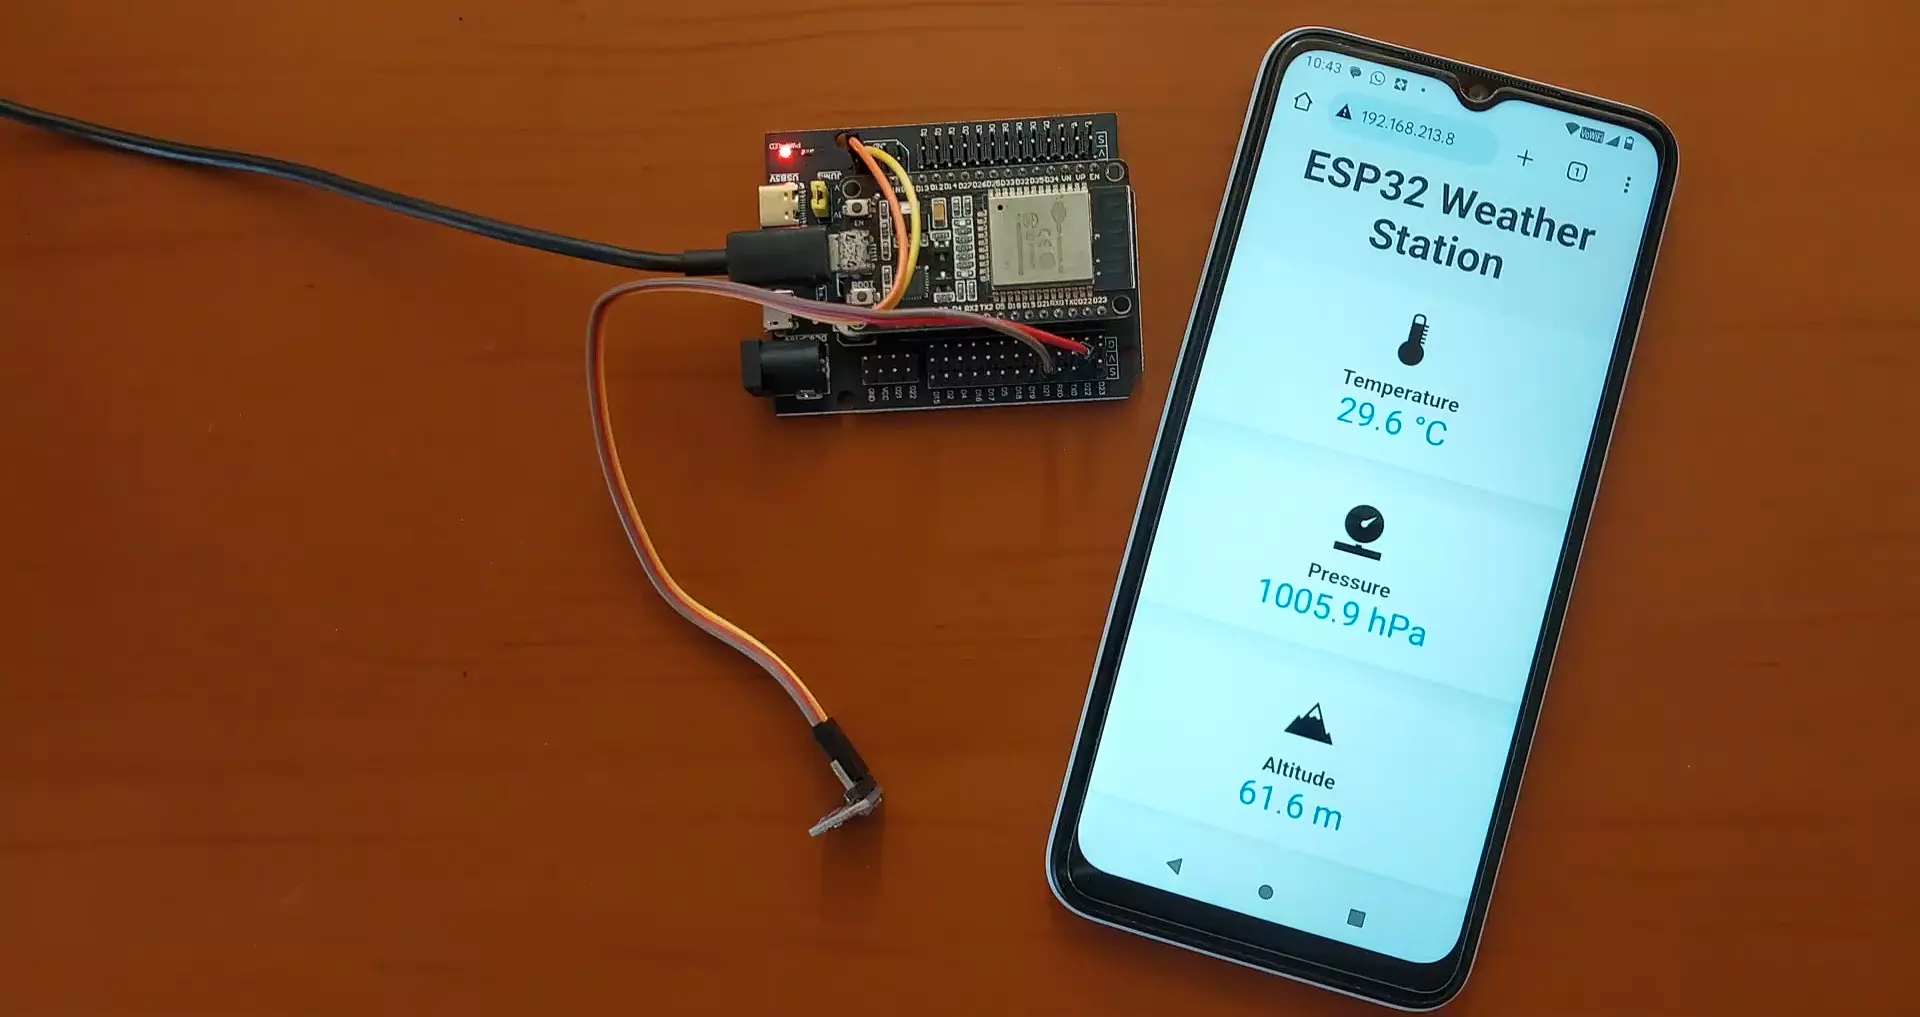
Accessing the Weather Data
Once you upload the code to ESP32, open the Serial Monitor (115200 baud rate) to find the ESP32’s IP address. Enter this IP address in a web browser to see the live weather data.
Conclusion
This project demonstrates how to create a versatile weather station using the ESP32 with either the BMP280 or BME280 sensor. With Wi-Fi connectivity, you can monitor temperature, humidity (if using BME280), pressure, and altitude from anywhere on the network. This setup can be expanded to include data logging, cloud storage, or mobile app integration for enhanced usability.
Additionally, you can add a display module (like OLED or LCD) to visualize real-time data without needing a web browser. Weatherproofing the sensor with an enclosure will allow for outdoor applications, making it a robust solution for personal and industrial monitoring.
