Air pollution has become a critical issue in modern society, affecting human health and the environment. Monitoring air quality is essential for creating a healthier living environment. With advancements in IoT (Internet of Things) technology, real-time air quality monitoring has become more accessible and efficient. In this project, we will build an IoT-Based Air Quality Monitoring System using the ESP32 microcontroller, BME680 sensor, and Blynk IoT platform to collect and analyze data on air quality parameters such as temperature, humidity, pressure, and volatile organic compounds (VOC).
IOT Based Air Quality Monitoring System: ESP32 & BME680
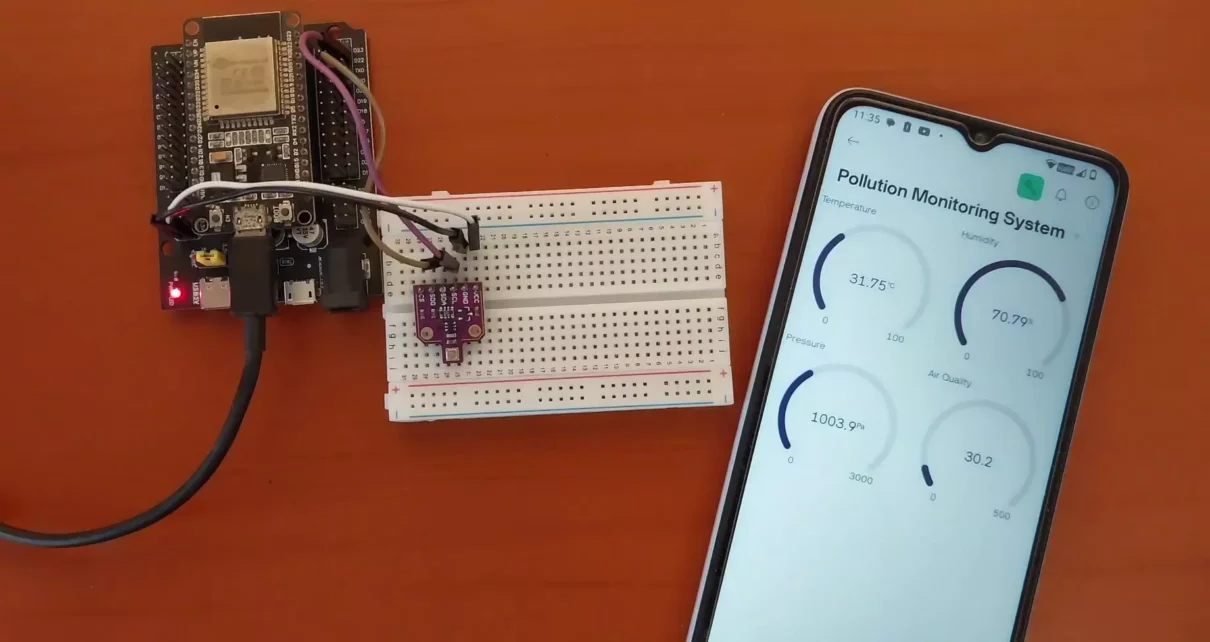
The system consists of an ESP32 microcontroller that collects data from the BME680 environmental sensor and transmits it to the Blynk IoT cloud over WiFi. Users can monitor real-time air quality through the Blynk mobile application. The system provides continuous updates, allowing users to track air quality trends and take preventive measures if pollution levels rise.
Features of the System:
- Real-time monitoring of temperature, humidity, pressure, and air quality (VOC levels)
- Wireless data transmission using WiFi and Blynk
- Remote access through a smartphone application
- Low power consumption for continuous operation
- Scalability for additional sensors or functionalities
Components Required
To build this project, you will need the following components:
| Component | Description |
|---|---|
| ESP32 Board | WiFi-enabled microcontroller |
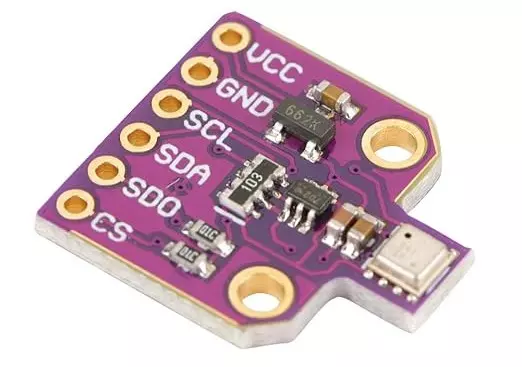
| BME680 Sensor | Air quality sensor (VOC, temp, humidity, pressure) |
| Jumper Wires | For circuit connections |
| Breadboard | For prototyping connections |
| 5V Power Source | Power supply for ESP32 |
Air Quality Monitoring System Circuit Diagram & Connections
The BME680 sensor communicates with the ESP32 using the I2C protocol. Below are the pin connections:
| BME680 Pin | ESP32 Pin |
|---|---|
| VCC | 3.3V |
| GND | GND |
| SDA | GPIO21 |
| SCL | GPIO22 |
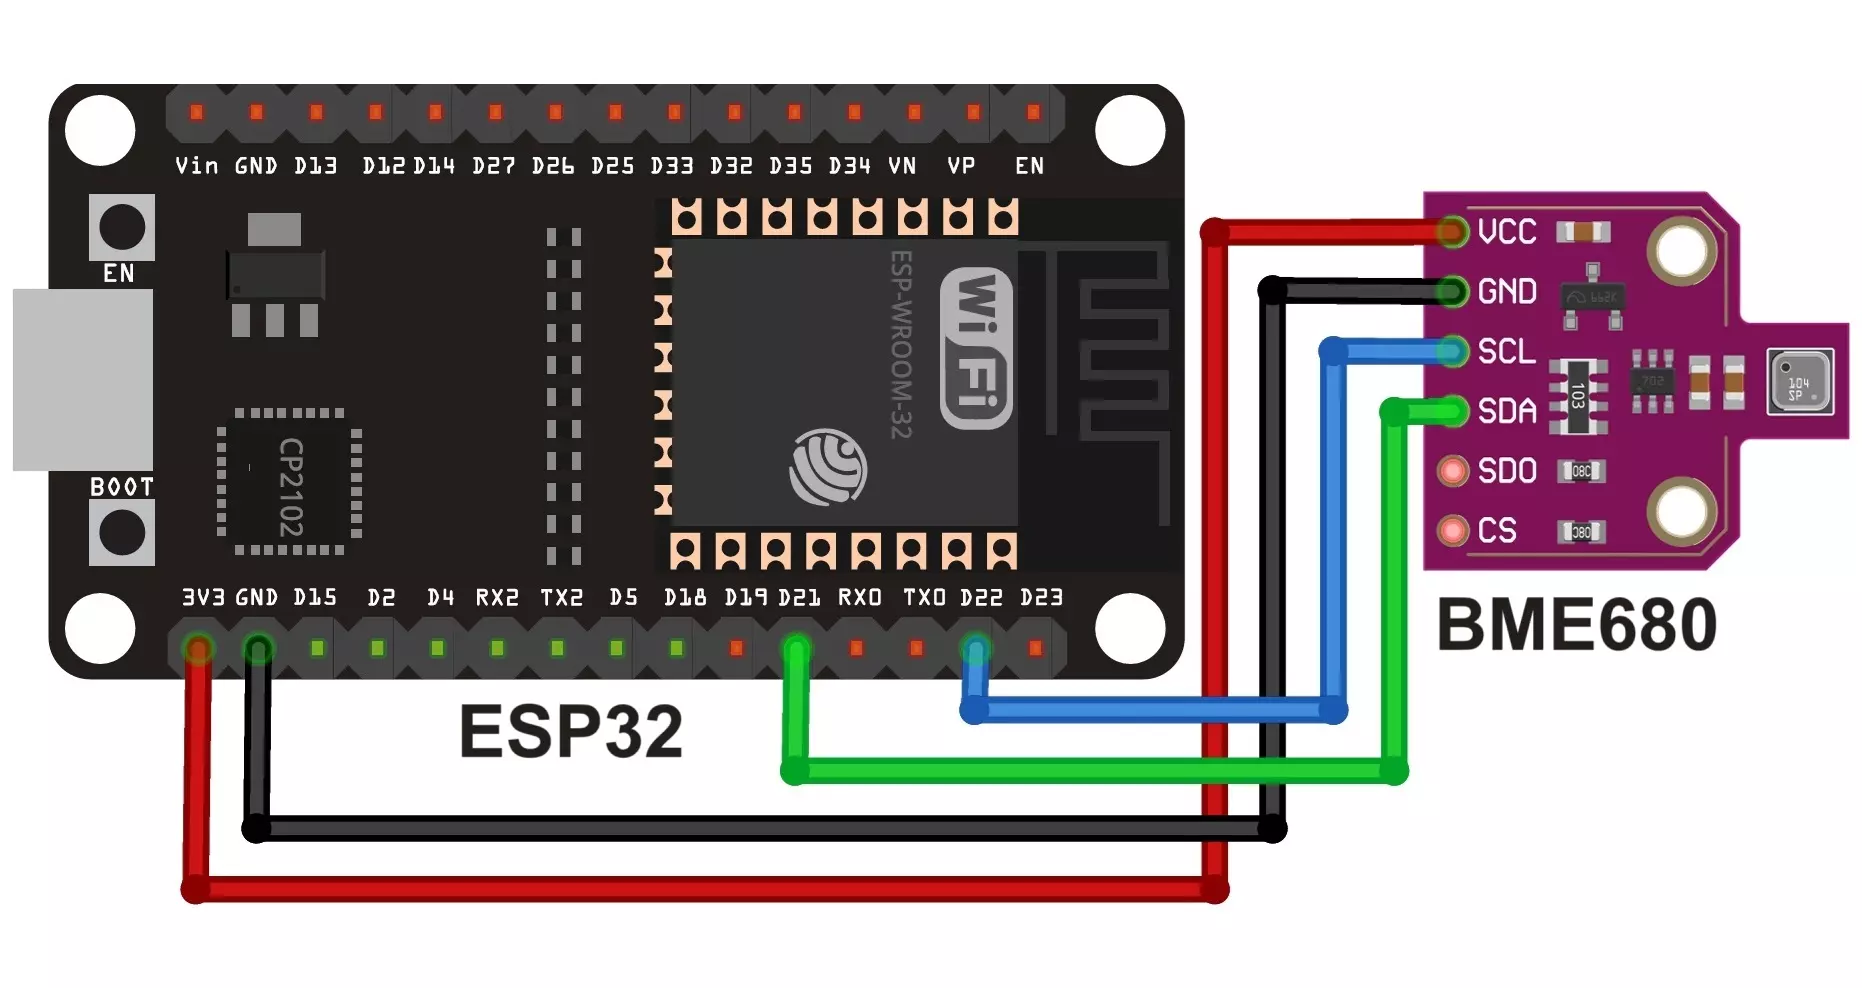
Ensure that the connections are secure and correctly configured before proceeding with the software setup.
Setting Up Blynk Application
To visualize the data remotely, we will use the Blynk IoT platform:
- Download and install the Blynk app (available for Android & iOS).
- Create a new project and select ESP32 as the hardware.
- Copy the Blynk authentication token (Auth Token) from the app.
- Add four Virtual Pins (V0, V1, V2, V3) for temperature, humidity, pressure, and air quality readings.
- Add gauges to view data from respective virtual pins.
- Save the setup and move to the coding part.
Programming the ESP32
The ESP32 microcontroller is programmed using Arduino IDE with necessary libraries installed.
Required Libraries:
- Adafruit BME680 (for sensor readings)
- WiFi (for internet connectivity)
- Blynk (for cloud integration)
Install these libraries in Arduino IDE before uploading the code.
Code for Air Quality Monitoring System
#define BLYNK_TEMPLATE_ID "TMPL3l_fOnAG7"
#define BLYNK_TEMPLATE_NAME "Air Quality Monitor"
#define BLYNK_AUTH_TOKEN "YourAuthToken"

#define BLYNK_PRINT Serial
#include <Wire.h>
#include <Adafruit_Sensor.h>
#include <Adafruit_BME680.h>
#include <WiFi.h>
#include <BlynkSimpleEsp32.h>

char auth[] = BLYNK_AUTH_TOKEN;
char ssid[] = "YourSSID";
char pass[] = "YourPassword";

Adafruit_BME680 bme;
BlynkTimer timer;

void setup() {
    Serial.begin(115200);
    WiFi.begin(ssid, pass);
    while (WiFi.status() != WL_CONNECTED) {
        delay(1000);
        Serial.println("Connecting to WiFi...");
    }
    Serial.println("Connected to WiFi!");

    Blynk.begin(auth, ssid, pass);

    if (!bme.begin()) {
        Serial.println("BME680 Sensor not found!");
        while (1);
    }

    bme.setTemperatureOversampling(BME680_OS_8X);
    bme.setHumidityOversampling(BME680_OS_2X);
    bme.setPressureOversampling(BME680_OS_4X);
    bme.setGasHeater(320, 150);

    timer.setInterval(10000L, sendSensorData);
}

void sendSensorData() {
    if (!bme.performReading()) {
        Serial.println("Failed to read BME680 sensor!");
        return;
    }

    float temp = bme.temperature;
    float hum = bme.humidity;
    float press = bme.pressure / 100.0;
    float air_quality = bme.gas_resistance / 1000.0;

    Serial.print("Temperature: "); Serial.print(temp); Serial.println(" °C");
    Serial.print("Humidity: "); Serial.print(hum); Serial.println(" %");
    Serial.print("Pressure: "); Serial.print(press); Serial.println(" hPa");
    Serial.print("Air Quality: "); Serial.print(air_quality); Serial.println(" kOhms");

    Blynk.virtualWrite(V0, temp);
    Blynk.virtualWrite(V1, hum);
    Blynk.virtualWrite(V2, press);
    Blynk.virtualWrite(V3, air_quality);
}

void loop() {
    Blynk.run();
    timer.run();
}
Working of Air Quality Monitor with ESP32 & BME680
- The ESP32 connects to WiFi and establishes a connection with Blynk’s cloud.
- The BME680 sensor continuously measures temperature, humidity, pressure, and VOC levels.
- Every 10 seconds, the ESP32 reads the sensor data and transmits it to Blynk.
- Also, ESP32 sends data to Serial Monitor.
- Users can monitor live air quality data using the Blynk mobile application.
Explanation of the IoT-Based Air Quality Monitoring System Code
This code is designed to monitor air pollution using an ESP32, a BME680 sensor, and the Blynk IoT platform. The system collects temperature, humidity, air pressure, and air quality (VOC levels) and sends the data to Blynk for remote monitoring.
Libraries & Definitions
#define BLYNK_TEMPLATE_ID "TMPL3l_fOnAG7"
#define BLYNK_TEMPLATE_NAME "Pollution Monitoring System"
#define BLYNK_AUTH_TOKEN "Auth Code"
- These Blynk credentials (template ID, name, and authentication token) are required to connect the ESP32 to the Blynk cloud.
#define BLYNK_PRINT Serial
#include <Wire.h>
#include <Adafruit_Sensor.h>
#include <Adafruit_BME680.h>
#include <WiFi.h>
#include <BlynkSimpleEsp32.h>
Wire.h→ Used for I2C communication.Adafruit_Sensor.h&Adafruit_BME680.h→ Required for reading data from the BME680 sensor.WiFi.h→ Enables ESP32 to connect to a WiFi network.BlynkSimpleEsp32.h→ Provides the necessary functions to connect ESP32 to Blynk.
WiFi and Blynk Setup
char auth[] = BLYNK_AUTH_TOKEN;
char ssid[] = "Your SSID";
char pass[] = "Your Password";
- Replace
Your SSIDandYour Passwordwith your actual WiFi credentials to enable internet connectivity.
Adafruit_BME680 bme;
BlynkTimer timer;
bme→ Object to interact with the BME680 sensor.timer→ A Blynk timer used to send sensor data at fixed intervals.
Setup Function (setup())
void setup() {
    Serial.begin(115200);
- Initializes serial communication at 115200 baud rate for debugging.
🟢 Connect to WiFi
    WiFi.begin(ssid, pass);
    while (WiFi.status() != WL_CONNECTED) {
        delay(1000);
        Serial.println("Connecting to WiFi...");
    }
    Serial.println("Connected to WiFi!");
- ESP32 connects to WiFi.
- The
whileloop keeps checking until the device is successfully connected.
🟢 Connect to Blynk
Blynk.begin(auth, ssid, pass);
- Connects the ESP32 to Blynk’s cloud server using WiFi.
🟢 Initialize the BME680 Sensor
    if (!bme.begin()) {
        Serial.println("Could not find a valid BME680 sensor!");
        while (1);
    }
- Checks if the BME680 sensor is properly connected.
- If not, the code stops execution.
🟢 Configure Sensor Settings
    bme.setTemperatureOversampling(BME680_OS_8X);
    bme.setHumidityOversampling(BME680_OS_2X);
    bme.setPressureOversampling(BME680_OS_4X);
    bme.setGasHeater(320, 150); // 320°C for 150ms
- These settings control sensor accuracy and response time:
- Temperature Oversampling (8X): Improves accuracy.
- Humidity Oversampling (2X): Reduces noise in humidity readings.
- Pressure Oversampling (4X): Balances accuracy & response time.
- Gas Heater (320°C, 150ms): Heats up the sensor to measure VOC levels.
🟢 Schedule Data Collection Every 10 Seconds
timer.setInterval(10000L, sendSensorData);
- Calls
sendSensorData()every 10 seconds to read and send sensor data.
Sending Sensor Data (sendSensorData())
void sendSensorData() {
    if (!bme.performReading()) {
        Serial.println("Failed to read BME680 sensor!");
        return;
    }
- Checks if sensor data is available.
- If reading fails, it prints an error message and exits.
🟢 Read Sensor Values
    float temp = bme.temperature;
    float hum = bme.humidity;
    float press = bme.pressure / 100.0; // Convert to hPa
    float air_quality = bme.gas_resistance / 1000.0; // Convert to kOhms
- Temperature (
temp) → °C - Humidity (
hum) → % - Pressure (
press) → Converted to hPa. - Air Quality (
air_quality) → Measured in kOhms (higher value = cleaner air).
🟢 Print Data to Serial Monitor
    Serial.print("Temperature: "); Serial.print(temp); Serial.println("°C");
    Serial.print("Humidity: "); Serial.print(hum); Serial.println("%");
    Serial.print("Pressure: "); Serial.print(press); Serial.println(" hPa");
    Serial.print("Air Quality (VOC): "); Serial.print(air_quality); Serial.println(" kOhms");
- Displays the sensor readings in the Serial Monitor.
🟢 Send Data to Blynk
    Blynk.virtualWrite(V0, temp);
    Blynk.virtualWrite(V1, hum);
    Blynk.virtualWrite(V2, press);
    Blynk.virtualWrite(V3, air_quality);
- Sends temperature, humidity, pressure, and air quality values to Blynk virtual pins (V0-V3).
Main Loop (loop())
void loop() {
    Blynk.run();
    timer.run();
}
Blynk.run();Maintains the Blynk connection.timer.run();Executes thesendSensorData()function every 10 seconds.
Expected Output (Serial Monitor)
Connecting to WiFi...
Connected to WiFi!
Temperature: 25.5°C
Humidity: 60.3%
Pressure: 1012.5 hPa
Air Quality (VOC): 150.2 kOhms
How to View Data on Blynk
- Open the Blynk app on your smartphone.
- Add 4 Gauge or Label widgets:
- V0 → Temperature
- V1 → Humidity
- V2 → Pressure
- V3 → Air Quality
- Run the project to see real-time pollution monitoring.
This project is scalable and can be extended with alerts, data logging, or AI-based predictions.
Applications of Air Quality Monitoring System
- Smart Cities: Monitoring pollution levels for environmental protection.
- Home Automation: Detecting indoor air quality and alerting users.
- Industrial Monitoring: Ensuring safe air conditions in workplaces.
- Agriculture: Measuring climate conditions for optimized crop growth.
- Weather Stations Climate data collection from various places.
Conclusion
This IoT-based air quality monitoring system provides an efficient way to track environmental conditions using an ESP32 and BME680 sensor. The integration with Blynk allows users to access real-time data remotely. This project can be further enhanced by adding alerts, data logging, and AI-based predictive analysis for improved air quality management.
By implementing this system, we contribute to a cleaner and healthier environment while leveraging the power of IoT technology.
3 Simple IR Proximity Sensor Circuits with Working & Applications
