
Weather monitoring is essential for various applications, from agriculture to home automation. The Arduino-based Weather Station using the BME680 sensor allows users to measure temperature, humidity, pressure, and gas resistance. The data will be displayed on an I2C LCD screen in cyclical manner, also it calculates Dew Point using Magnus formula and Altitude from pressure. This project provides an affordable and efficient solution for real-time environmental monitoring and can be expanded for IoT-based applications.
Components Required for Arduino Weather Station
To build this weather station, you need the following components:
- Arduino Board (Uno, Nano, or Mega)
- BME680 Sensor (for measuring temperature, humidity, pressure, and gas resistance)
- 16×2 I2C LCD Display (for data visualization)
- Jumper Wires
- Breadboard (for prototyping)
- Power Source (USB cable or battery)
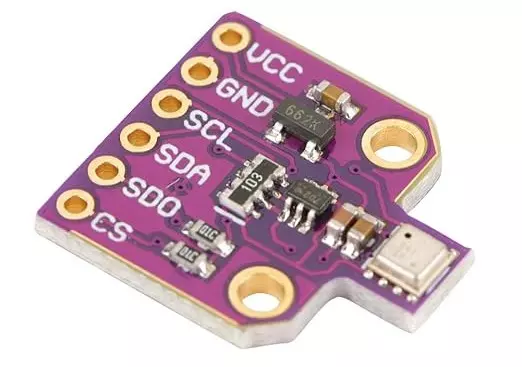
Understanding the BME680 Sensor
The BME680 is an advanced environmental sensor developed by Bosch Sensortec. The BME680 is a highly versatile environmental sensor that combines temperature, humidity, pressure, and gas sensing in one compact module.
- Temperature: Accurate readings with low power consumption.
- Humidity: Essential for weather prediction and air quality monitoring.
- Pressure: Useful for altitude calculations and weather forecasting.
- Gas Resistance: Detects volatile organic compounds (VOCs) in the air, which helps determine air quality.
It is ideal for air quality monitoring, IoT applications, and smart devices. While it has some limitations (gas detection specificity), it remains one of the most popular sensors for environmental data collection.
1. Key Features of BME680 Sensor
- High Accuracy: Provides precise environmental readings.
- Compact Size: Small footprint, ideal for mobile and embedded applications.
- Low Power Consumption: Optimized for battery-powered devices.
- Integrated Gas Sensor: Detects Volatile Organic Compounds (VOCs) for air quality monitoring.
- I²C and SPI Interfaces: Can be easily interfaced with microcontrollers.
- Operating Voltage: 1.71V to 3.6V
- Operating Range:
- Temperature: -40°C to 85°C
- Humidity: 0% to 100% RH
- Pressure: 300 hPa to 1100 hPa
- Gas: Measures IAQ (Indoor Air Quality) index
2. Working Principle
The BME680 has different sensors that work together:
(A) Temperature Sensor (MEMS)
- Based on a Micro-Electro-Mechanical System (MEMS).
- Uses a resistive temperature detector (RTD).
- Measures temperature changes due to resistance variations.
(B) Humidity Sensor (Capacitive)
- Uses a polymer dielectric layer.
- Measures changes in capacitance due to water absorption.
(C) Pressure Sensor (Piezo-Resistive)
- Uses a MEMS pressure-sensing element.
- Detects atmospheric pressure variations, useful for altitude and weather applications.
(D) Gas Sensor (MOX – Metal Oxide)
- Detects Volatile Organic Compounds (VOCs) and other gases.
- Based on Metal-Oxide (MOX) technology.
- Resistance changes when exposed to gases, indicating air quality levels.
3. Communication Interfaces
The BME680 supports two types of communication:
- I²C (Inter-Integrated Circuit) – Uses 2 pins (SDA & SCL) for data transfer.
- SPI (Serial Peripheral Interface) – Uses 4 pins (MISO, MOSI, SCK, CS).
It allows easy integration with microcontrollers like Arduino, Raspberry Pi, ESP32, STM32, etc.
4. Applications
The BME680 is widely used in:
Air Quality Monitoring – Detects VOCs in smart homes & offices.
Weather Stations – Measures humidity, temperature, and pressure.
Smart Wearables – Provides environmental sensing in fitness trackers.
Industrial Safety – Detects harmful gases in factories.
Smart Agriculture – Monitors environmental conditions for precision farming.
IoT Devices – Used in smart city & automation projects.
5. Indoor Air Quality (IAQ) Interpretation with Gas Resistance
| IAQ Value | Air Quality | Gas Resistance (Ω) |
|---|---|---|
| 0 – 50 | Excellent | > 500 kΩ |
| 51 – 100 | Good | 200 – 500 kΩ |
| 101 – 150 | Moderate | 100 – 200 kΩ |
| 151 – 200 | Poor | 50 – 100 kΩ |
| 201 – 300 | Unhealthy | 10 – 50 kΩ |
| 301+ | Hazardous | < 10 kΩ |
- BME680 provides an IAQ score (0-500), where:
- Requires Bosch BSEC (Bosch Software Environmental Cluster) Library to process raw data into IAQ values.
6. Power Consumption
- Ultra-low power mode: Suitable for battery applications.
- Average power consumption: 0.09mA (humidity/temp/pressure) and 12mA (gas sensor).
- Sleep mode: Saves energy when not in use.
7. Comparison of BME680 with BME280 and BMP280 Sensors
| Feature | BME680 | BME280 | BMP280 |
|---|---|---|---|
| Temperature | ✅ Yes | ✅ Yes | ✅ Yes |
| Humidity | ✅ Yes | ✅ Yes | ❌ No |
| Pressure | ✅ Yes | ✅ Yes | ✅ Yes |
| Gas Sensor | ✅ Yes | ❌ No | ❌ No |
| IAQ Index | ✅ Yes | ❌ No | ❌ No |
| Power Usage | Moderate | Low | Low |
8. Limitations
- The gas sensor does not detect specific gases (only VOCs as a group).
- Requires burn-in time (~5-20 minutes) for accurate readings.
- IAQ values need BSEC library (closed-source, limited customization).
- Slightly higher power consumption than BME280.
Arduino Weather Station Circuit Diagram and Wiring
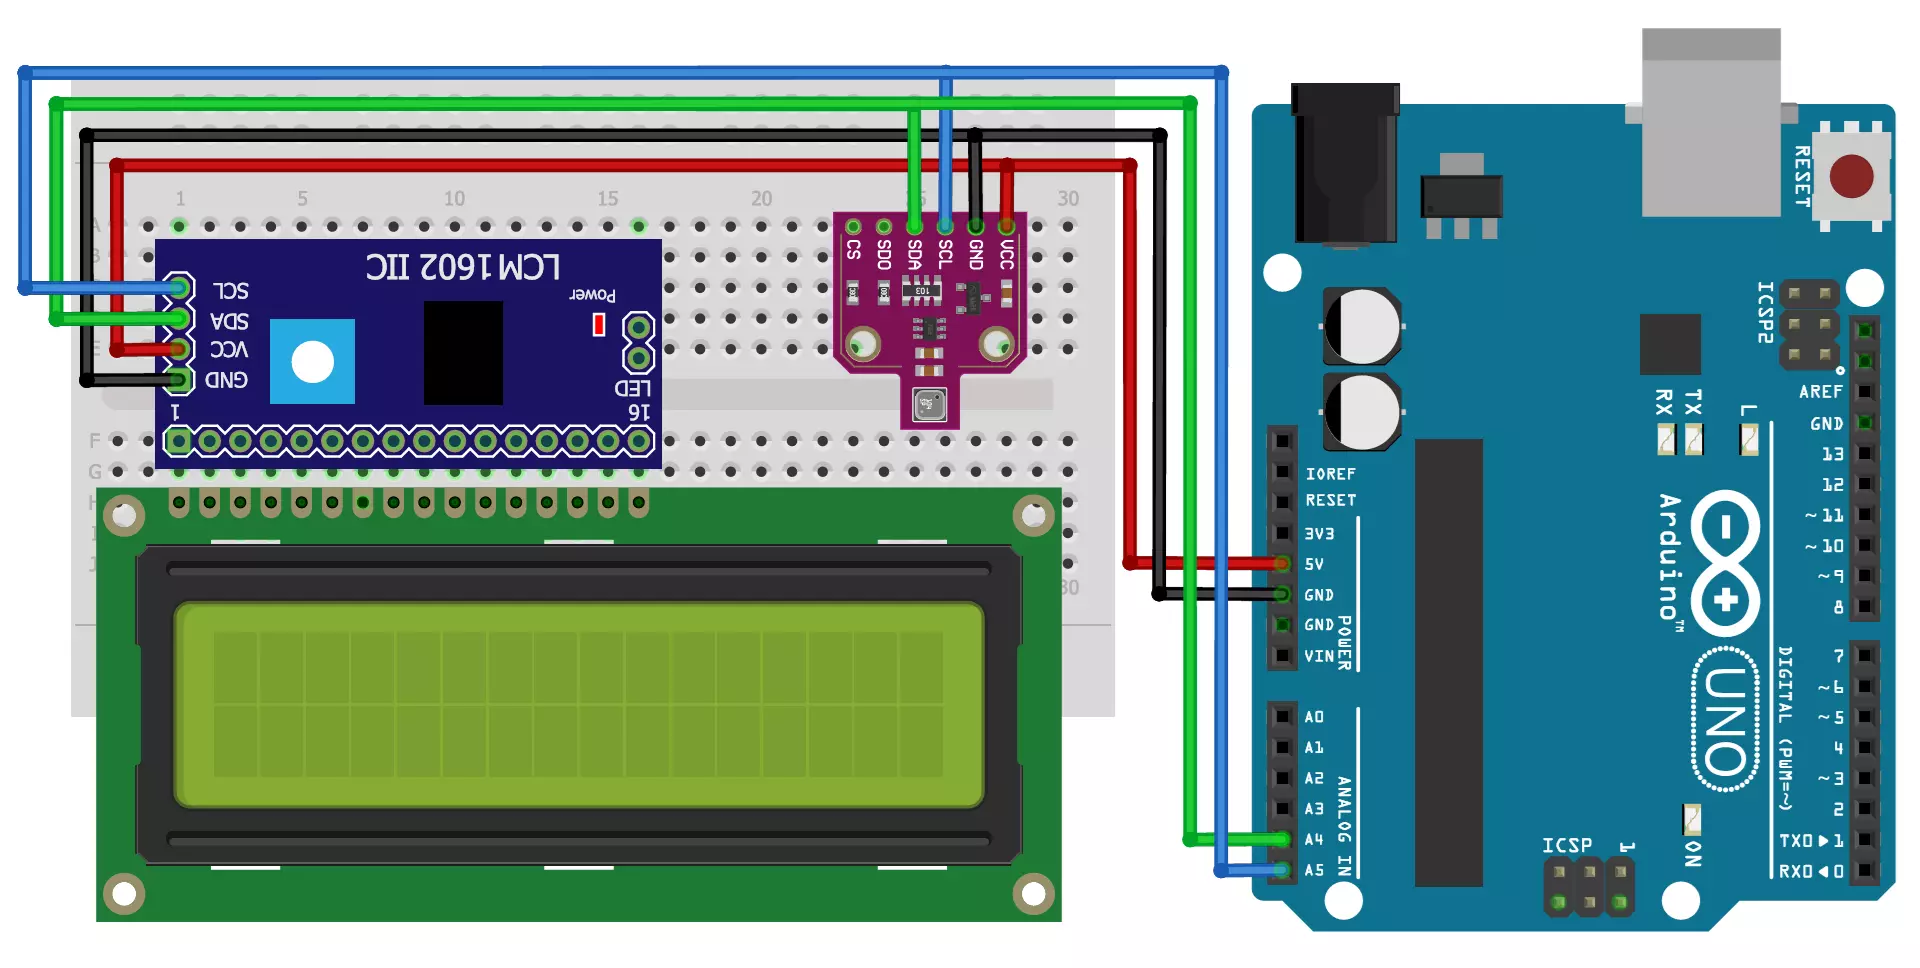
Connections
| Component | Arduino Pin |
|---|---|
| BME680 VCC | 5V |
| BME680 GND | GND |
| BME680 SDA | A4 (SDA) |
| BME680 SCL | A5 (SCL) |
| LCD VCC | 5V |
| LCD GND | GND |
| LCD SDA | A4 (SDA) |
| LCD SCL | A5 (SCL) |
The BME680 sensor and LCD display both communicate with Arduino via I2C protocol, making wiring simple and reducing the number of connections. This makes it ideal for beginners and professionals alike.
Arduino Weather Station Program
#include <Wire.h>
#include <Adafruit_Sensor.h>
#include "Adafruit_BME680.h"
#include <LiquidCrystal_I2C.h>

#define SEALEVELPRESSURE_HPA (1013.25)

Adafruit_BME680 bme; // I2C
LiquidCrystal_I2C lcd(0x27, 16, 2); // Change address if necessary

void setup()
{
Serial.begin(9600);
while (!Serial);
Serial.println(F("BME680 Weather Station"));

lcd.init();
lcd.backlight();
lcd.setCursor(3, 0);
lcd.print("Tech Trends");
lcd.setCursor(5, 1);
lcd.print("Shameer");
delay(2000);
lcd.clear();
lcd.setCursor(2, 0);
lcd.print("BME680 Weather");
lcd.setCursor(6, 1);
lcd.print("Station");
delay(2000);
lcd.clear();

if (!bme.begin())
{
Serial.println("Could not find a valid BME680 sensor, check wiring!");
while (1);
}

// Set up oversampling and filter initialization
bme.setTemperatureOversampling(BME680_OS_8X);
bme.setHumidityOversampling(BME680_OS_2X);
bme.setPressureOversampling(BME680_OS_4X);
bme.setIIRFilterSize(BME680_FILTER_SIZE_3);
bme.setGasHeater(320, 150); // 320*C for 150 ms
}

void loop()
{
if (! bme.performReading())
{
Serial.println("Failed to perform reading :(");
return;
}

float temperature = bme.temperature;
float pressure = bme.pressure / 100.0;
float altitude = bme.readAltitude(SEALEVELPRESSURE_HPA);
float humidity = bme.humidity;
float gas = bme.gas_resistance / 1000.0;
double dewPoint = dewPointFast(temperature, humidity);

Serial.print("Temperature = ");
Serial.print(temperature);
Serial.println(" *C");

Serial.print("Pressure = ");
Serial.print(pressure);
Serial.println(" hPa");

Serial.print("Humidity = ");
Serial.print(humidity);
Serial.println(" %");

Serial.print("Dew Point = ");
Serial.print(dewPoint);
Serial.println(" *C");

Serial.print("Approx. Altitude = ");
Serial.print(altitude);
Serial.println(" m");

Serial.print("Gas = ");
Serial.print(gas);
Serial.println(" KOhms");

// Display values on LCD
lcd.clear();
lcd.setCursor(0, 0);
lcd.print("Temp:");
lcd.print(temperature);
lcd.print(" C");

lcd.setCursor(0, 1);
lcd.print("Hum:");
lcd.print(humidity);
lcd.print(" %");
delay(2000);

lcd.clear();
lcd.setCursor(0, 0);
lcd.print("Pres:");
lcd.print(pressure);
lcd.print(" hPa");

lcd.setCursor(0, 1);
lcd.print("Alt:");
lcd.print(altitude);
lcd.print(" m");
delay(2000);

lcd.clear();
lcd.setCursor(0, 0);
lcd.print("Gas:");
lcd.print(gas);
lcd.print(" KOhm");

lcd.setCursor(0, 1);
lcd.print("Dew:");
lcd.print(dewPoint);
lcd.print(" C");
delay(2000);

Serial.println();
delay(2000);
}

double dewPointFast(double celsius, double humidity)
{
double a = 17.271;
double b = 237.7;
double temp = (a * celsius) / (b + celsius) + log(humidity * 0.01);
double Td = (b * temp) / (a - temp);
return Td;
}
Weather Station Code Explanation
This code is for an Arduino-based BME680 weather station that reads temperature, pressure, humidity, gas resistance, and dew point, then displays the values on an LCD screen and prints them to the serial monitor.
1. Included Libraries
#include <Wire.h>

#include <Adafruit_Sensor.h>

#include "Adafruit_BME680.h"

#include <LiquidCrystal_I2C.h>
#include <Wire.h>
#include <Adafruit_Sensor.h>
#include "Adafruit_BME680.h"
#include <LiquidCrystal_I2C.h>
Wire.h: Handles I2C communication.Adafruit_Sensor.h: Supports sensor-related functions.Adafruit_BME680.h: Handles the BME680 sensor.LiquidCrystal_I2C.h: Controls the I2C-based LCD.
2. Defining Constants and Initializing Devices
#define SEALEVELPRESSURE_HPA (1013.25)

Adafruit_BME680 bme; // I2C

LiquidCrystal_I2C lcd(0x27, 16, 2); // LCD at I2C address 0x27
#define SEALEVELPRESSURE_HPA (1013.25)
Adafruit_BME680 bme; // I2C
LiquidCrystal_I2C lcd(0x27, 16, 2); // LCD at I2C address 0x27
SEALEVELPRESSURE_HPA: Defines standard sea-level pressure.bme: Creates an instance of the BME680 sensor.lcd(0x27, 16, 2): Defines an LCD screen of 16×2 size with I2C address 0x27.
3. Setup Function
void setup()

{

Serial.begin(9600);

while (!Serial);

Serial.println(F("BME680 Weather Station"));
void setup()
{
Serial.begin(9600);
while (!Serial);
Serial.println(F("BME680 Weather Station"));
- Initializes serial communication at 9600 baud rate.
- Waits for the serial monitor to be ready.
- Prints “BME680 Weather Station” to the serial monitor.
LCD Welcome Messages
lcd.init();

lcd.backlight();

lcd.setCursor(3, 0);

lcd.print("Welcome");

lcd.setCursor(5, 1);

lcd.print("Your Name");

delay(2000);

lcd.clear();
- Initializes and clears the LCD.
- Displays “Welcome” and “Your Name” for 2 seconds.
Sensor Initialization
if (!bme.begin())

{

Serial.println("Could not find a valid BME680 sensor, check wiring!");

while (1);

}
- Checks if the BME680 sensor is working.
- If not detected, prints an error message and halts execution.
Configuring Sensor Settings
bme.setTemperatureOversampling(BME680_OS_8X);

bme.setHumidityOversampling(BME680_OS_2X);

bme.setPressureOversampling(BME680_OS_4X);

bme.setIIRFilterSize(BME680_FILTER_SIZE_3);

bme.setGasHeater(320, 150); // 320°C for 150ms
- Configures oversampling for temperature, humidity, and pressure.
- Sets up gas heater settings for accurate readings.
4. Main Loop
void loop()

{

if (! bme.performReading())

{

Serial.println("Failed to perform reading :(");

return;

}
void loop()
{
if (! bme.performReading())
{
Serial.println("Failed to perform reading :(");
return;
}
- Reads sensor values; if reading fails, prints an error and exits.
Extracting Sensor Data
float temperature = bme.temperature;

float pressure = bme.pressure / 100.0;

float altitude = bme.readAltitude(SEALEVELPRESSURE_HPA);

float humidity = bme.humidity;

float gas = bme.gas_resistance / 1000.0;

double dewPoint = dewPointFast(temperature, humidity);
-
- Stores sensor readings into variables.
- Pressure is converted from Pa to hPa.
- Gas resistance is converted from Ω to KΩ.
- Dew point is calculated using the
dewPointFast()function.
Displaying Readings on Serial Monitor
Serial.print("Temperature = ");

Serial.print(temperature);

Serial.println(" *C");

Serial.print("Pressure = ");

Serial.print(pressure);

Serial.println(" hPa");

Serial.print("Humidity = ");

Serial.print(humidity);

Serial.println(" %");

Serial.print("Dew Point = ");

Serial.print(dewPoint);

Serial.println(" *C");

Serial.print("Approx. Altitude = ");

Serial.print(altitude);

Serial.println(" m");

Serial.print("Gas = ");

Serial.print(gas);

Serial.println(" KOhms");
- Prints temperature, pressure, humidity, dew point, altitude, and gas resistance.
Displaying Readings on LCD
The LCD alternates between different readings every 2 seconds.
- Temperature & Humidity
lcd.clear();

lcd.setCursor(0, 0);

lcd.print("Temp:");

lcd.print(temperature);

lcd.print(" C");

lcd.setCursor(0, 1);

lcd.print("Hum:");

lcd.print(humidity);

lcd.print(" %");

delay(2000);
- Pressure & Altitude
lcd.clear();

lcd.setCursor(0, 0);

lcd.print("Pres:");

lcd.print(pressure);

lcd.print(" hPa");

lcd.setCursor(0, 1);

lcd.print("Alt:");

lcd.print(altitude);

lcd.print(" m");

delay(2000);
- Gas Resistance & Dew Point
lcd.clear();

lcd.setCursor(0, 0);

lcd.print("Gas:");

lcd.print(gas);

lcd.print(" KOhm");

lcd.setCursor(0, 1);

lcd.print("Dew:");

lcd.print(dewPoint);

lcd.print(" C");

delay(2000);

}
- Dew Point Calculation
double dewPointFast(double celsius, double humidity)

{

double a = 17.271;

double b = 237.7;

double temp = (a * celsius) / (b + celsius) + log(humidity * 0.01);

double Td = (b * temp) / (a - temp);

return Td;

}
- Uses the Magnus formula to estimate the dew point temperature.
- Each measurement is displayed for 2 seconds before updating.
Summary of Program
- Libraries Included: The required libraries handle I2C communication and BME680 sensor functionalities.
- BME680 Initialization: The sensor is set up with oversampling and a gas heater to improve accuracy.
- Data Retrieval: The
performReading()function fetches temperature, humidity, pressure, and gas resistance values. - Displaying Data: The LCD screen displays temperature and humidity, updating every 2 seconds.
- Error Handling: The code includes error handling for failed sensor readings.
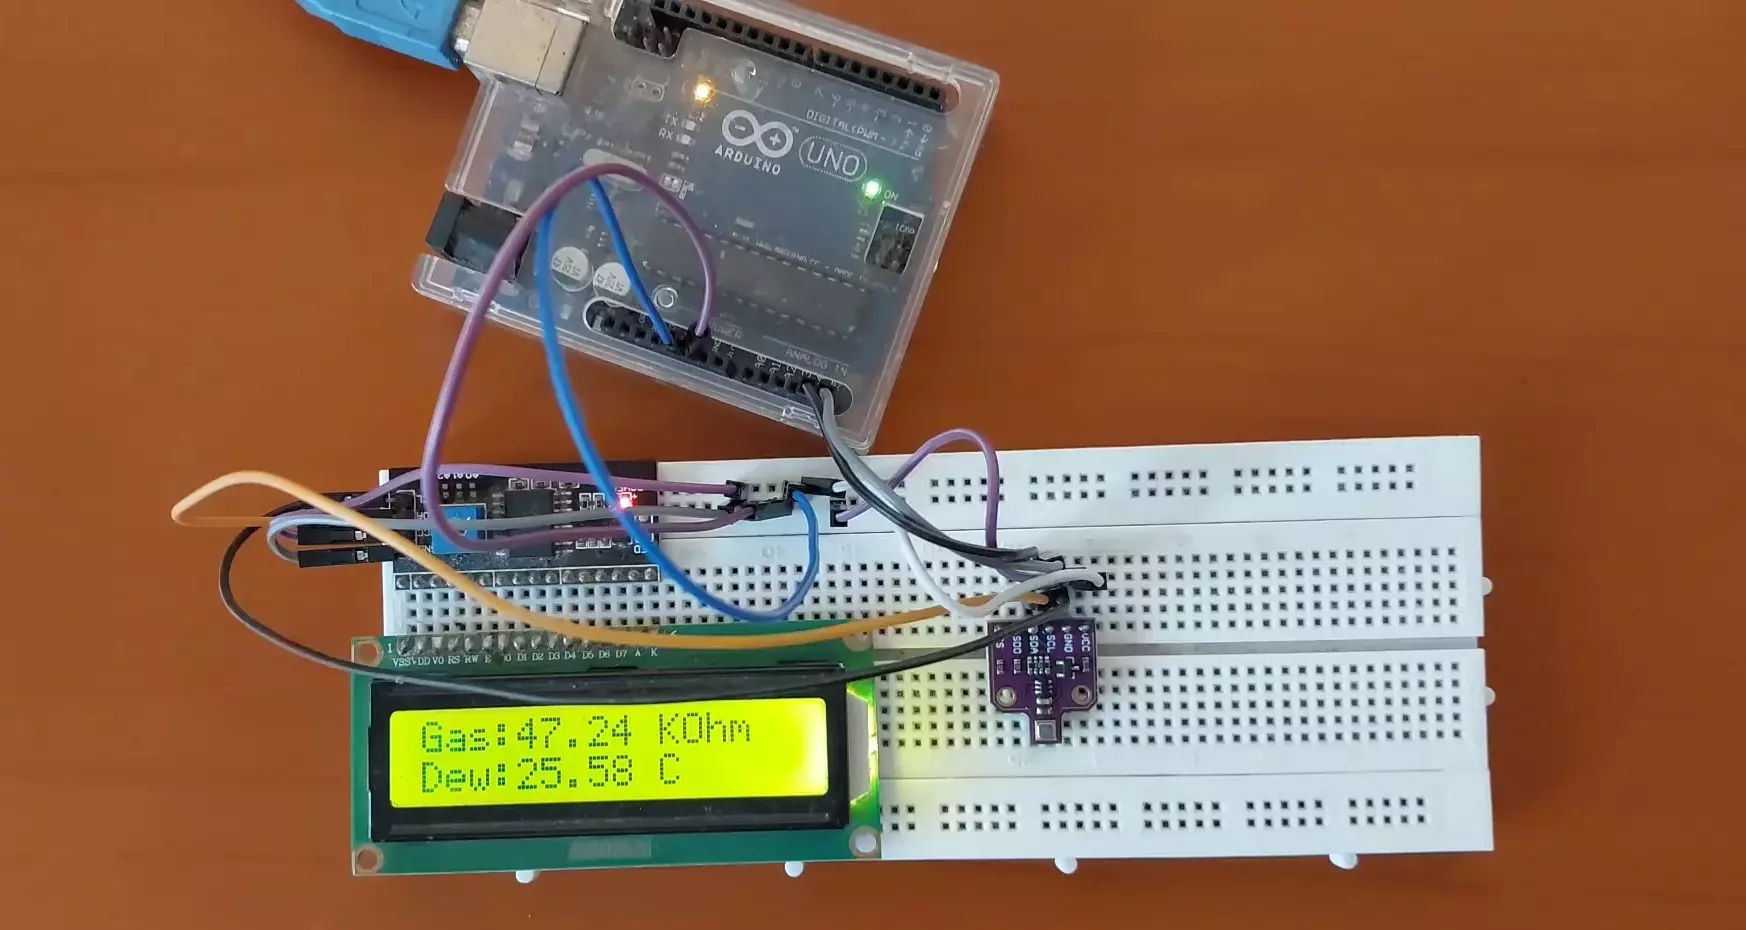
LCD Display Output
Temp: 24.5 'C
Hum: 60.2 %
Pres: 1010.5 hPa
Alt: 81M
Gas: 48.2 KOhms
Dew: 25.58'C
Applications of Arduino Weather Station Project
- Smart Agriculture: Helps farmers monitor weather conditions to optimize irrigation and crop growth.
- Home Automation: Integrate with IoT for smart homes that adjust ventilation based on air quality.
- Indore Air Quality Monitoring: Detect harmful gas levels and provide warnings for indoor pollution.
- Weather Prediction: Analyzing pressure trends can help predict changes in weather conditions.
- Disaster Management: Can be used to monitor atmospheric changes that indicate potential storms or cyclones.
Enhancements & Future Improvements
- Data Logging: Store readings on an SD card to track trends over time.
- Wireless Communication: Send data via Wi-Fi, Bluetooth, or LoRa for remote monitoring.
- Mobile App Integration: View weather updates on a smartphone via a dedicated app.
- Solar Power: Use a solar panel to power the device for outdoor installations.
- Advanced Display: Upgrade to an OLED or TFT display for a better visual experience.
Conclusion
This Arduino Weather Station using the BME680 sensor provides real-time weather data in a compact and efficient system. With further enhancements, it can be integrated into IoT applications for smart cities and environmental monitoring. Its flexibility makes it an excellent project for learning embedded systems and building practical weather monitoring solutions.
