Let’s learn how to build an Environment Monitoring System with Arduino, ESP32, Soil Moisture Sensor, and DHT11 Sensor. Monitoring environmental conditions such as soil moisture, temperature, and humidity is essential for applications in agriculture, gardening, and climate control. We’ll cover the working principles of these sensors, how to interface them with Arduino or ESP32, and how to visualize the data using serial communication on LCD display or over IoT platforms like Blynk or ThingSpeak.
Components Required
- ESP32 dev board
- Arduino Uno board
- DHT11 temperature and humidity sensor
- Soil moisture sensor module
- 16×2 LCD Display (with I2C Module)
- Jumper wires
- Breadboard
- Power source (e.g., USB cable or battery pack)
- Optional: IoT platform account (e.g., Blynk or ThingSpeak)
DHT11 Temperature and Humidity Sensor
The DHT11 sensor is widely used for measuring temperature and humidity. It uses a capacitive humidity sensor and a thermistor to sense environmental conditions and outputs the data as a digital signal. Let’s see the working of DHT11 sensor:
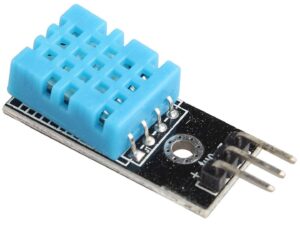
Humidity Sensing:
- The DHT11 uses a capacitive humidity sensor.
- The sensor has two electrodes with a moisture-holding substrate between them. As the substrate absorbs moisture from the air, its capacitance changes. This change is converted into a digital signal.
Temperature Sensing:
The temperature is measured using a thermistor (a resistor whose resistance changes with temperature). The sensor converts this resistance into a digital temperature reading.
Signal Processing:
The internal microcontroller of the DHT11 processes the raw data from the sensing elements (humidity and temperature) and outputs it as a digital signal using a single-wire communication protocol.
- Specifications:
- Temperature range: 0°C to 50°C
- Humidity range: 20% to 90%
- Accuracy: ±2°C for temperature, ±5% for humidity
- Operating voltage: 3.3V to 5V
- Connections:
- VCC: Power supply (3.3V or 5V from ESP32)
- GND: Ground
- Data: Digital output pin
Capacitive Soil Moisture Sensor
A capacitive soil moisture sensor is a type of sensor used to measure the water content in soil. It works on the principle of capacitance, which changes based on the dielectric constant of the medium surrounding the sensor. Here’s a detailed explanation of how it works:
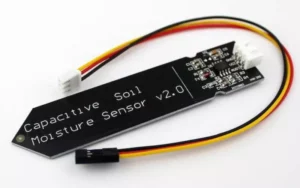
Key Components
- Capacitor Plates: Two conductive plates form the capacitor. These plates are separated by a non-conductive material (dielectric).
- Dielectric Medium: In this case, the soil acts as the dielectric medium.
- Electronic Circuit: Includes components to measure changes in capacitance and convert them into a usable signal.
Working Principle
Capacitance Basics:
- Capacitance depends on the dielectric constant of the material between the plates, the area of the plates, and the distance between them.
- The dielectric constant of water (~80) is much higher than that of dry soil (~3-5) or air (~1).
Water Content Measurement:
- When the soil contains more water, the overall dielectric constant of the soil increases.
- This results in a higher capacitance of the sensor.
- Conversely, when the soil is dry, the dielectric constant is lower, leading to lower capacitance.
Signal Conversion:
- The change in capacitance is detected by the electronic circuit.
- The circuit typically converts this change into a voltage or frequency signal proportional to the moisture content in the soil.
- The output signal is usually an analog or digital value that can be read by a microcontroller (e.g., Arduino or Raspberry Pi).
Capacitive Soil Moisture Sensor Specification
- Power: Works with 3.3V to 5.5V DC.
- Output: Sends an analog voltage signal (0–3V) based on soil moisture.
- Current Usage: Needs about 5mA.
- Connections: 3-pin interface for microcontrollers like Arduino.
- No Rust: Uses capacitive sensing, so no metal exposure to soil.
- Long-Lasting: Waterproof and dustproof, good for outdoor use.
- Connections:
- VCC: Power supply (3.3V or 5V from ESP32)
- GND: Ground
- AOUT: Analog output pin
Interfacing DHT11 and Soil Moisture Sensor with Arduino
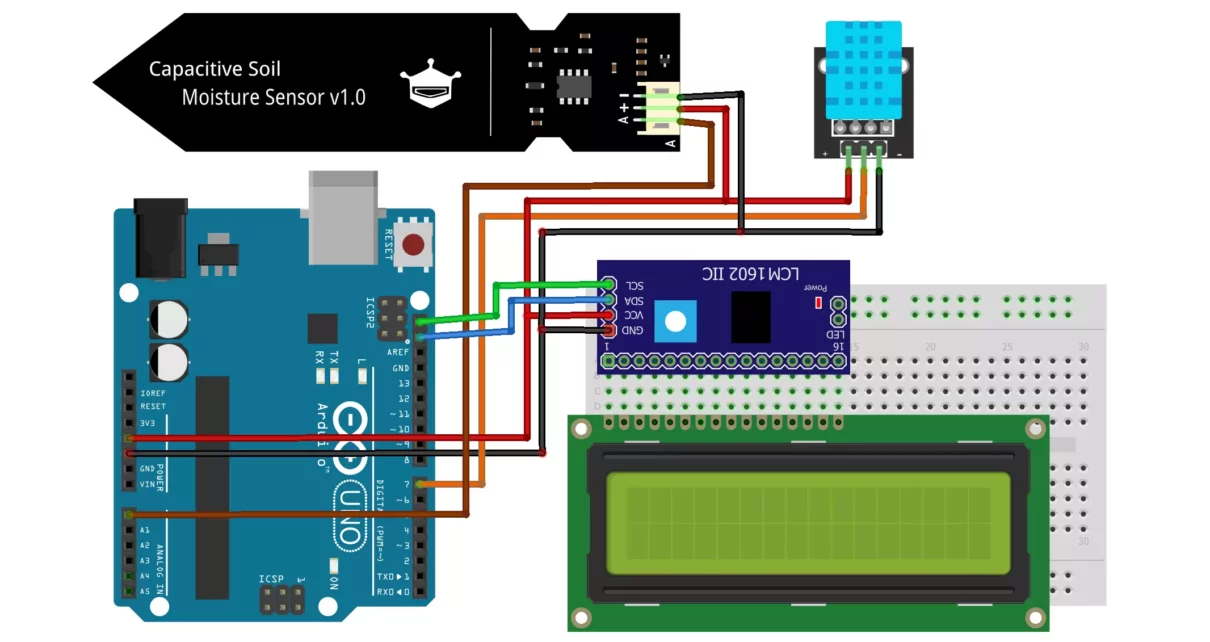
This system will monitor soil moisture levels, temperature, and humidity, displaying real-time data on an LCD screen.
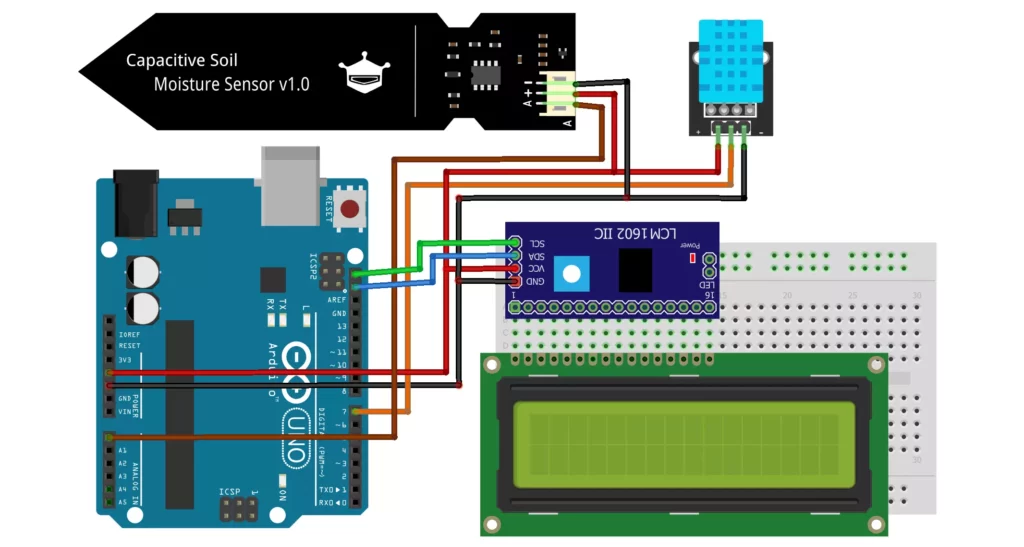
Circuit Diagram
Here is the wiring of above circuit:
Soil Moisture Sensor:
- VCC to Arduino 5V
- GND to Arduino GND
- A (Analog Output) to Arduino A0
DHT11 Sensor:
- VCC to Arduino 5V
- GND to Arduino GND
- Data Pin to Arduino Digital Pin 7
LCD with I2C Module:
- SDA to Arduino SDA
- SCL to Arduino SCL
- VCC to Arduino 5V
- GND to Arduino GND
Code for Arduino
Below is the code for Interfacing DHT11 and Soil Moisture Sensor with Arduino:
#include <Wire.h>
#include <LiquidCrystal_I2C.h>
#include <DHT.h>

// Define DHT sensor
#define DHTPIN 7 // DHT11 data pin connected to Arduino pin 7
#define DHTTYPE DHT11
DHT dht(DHTPIN, DHTTYPE);

// Initialize the LCD
LiquidCrystal_I2C lcd(0x27, 16, 2);

// Soil moisture sensor pin
const int soilPin = A0;

void setup() {
  // Initialize LCD
  lcd.init();
  lcd.backlight();

  // Initialize DHT sensor
  dht.begin();

  // Start serial communication (optional)
  Serial.begin(9600);
}

void loop() {
  // Read temperature and humidity from DHT11
  float temperature = dht.readTemperature();
  float humidity = dht.readHumidity();

  // Read soil moisture level
  int soilValue = analogRead(soilPin);
  float soilMoisture = map(soilValue, 0, 1023, 0, 100); // Convert to percentage

  // Display data on LCD
  lcd.setCursor(0, 0);
  lcd.print("Temp: ");
  lcd.print(temperature);
  lcd.print(" C");

  lcd.setCursor(0, 1);
  lcd.print("Hum: ");
  lcd.print(humidity);
  lcd.print(" % ");

  delay(2000); // Hold the display for readability

  lcd.clear();

  lcd.setCursor(0, 0);
  lcd.print("Soil: ");
  lcd.print(soilMoisture);
  lcd.print(" %");

  delay(2000); // Hold the display for readability

  lcd.clear();

  // Optional: Print data to Serial Monitor
  Serial.print("Temperature: ");
  Serial.print(temperature);
  Serial.println(" C");
  Serial.print("Humidity: ");
  Serial.print(humidity);
  Serial.println(" %");
  Serial.print("Soil Moisture: ");
  Serial.print(soilMoisture);
  Serial.println(" %");
}
Explanation of the Code
Libraries:
Wire.handLiquidCrystal_I2C.hhandle the LCD module.DHT.hmanages communication with the DHT11 sensor.
Initialization: The LCD and DHT11 sensor are initialized in the setup() function.
Data Reading: The loop() function reads data from the sensors and maps the soil moisture value to a percentage.
Display: The sensor data is displayed on the LCD and optionally printed to the Serial Monitor.
Testing the System
- Connect all components as per the circuit diagram.
- Upload the code to the Arduino using the Arduino IDE.
- Open the Serial Monitor (optional) to view data in real-time.
- Observe the LCD screen for temperature, humidity, and soil moisture readings.
Enhancements
- Add a buzzer to alert when soil moisture drops below a threshold.
- Use a relay and water pump to automate watering based on soil moisture levels.
- Log data to an SD card or send it to a cloud platform for remote monitoring.
Interfacing DHT11 and Soil Moisture Sensor with ESP32
This environment monitoring system will visualize the soil moisture levels, temperature, and humidity data on Blynk IoT platform.
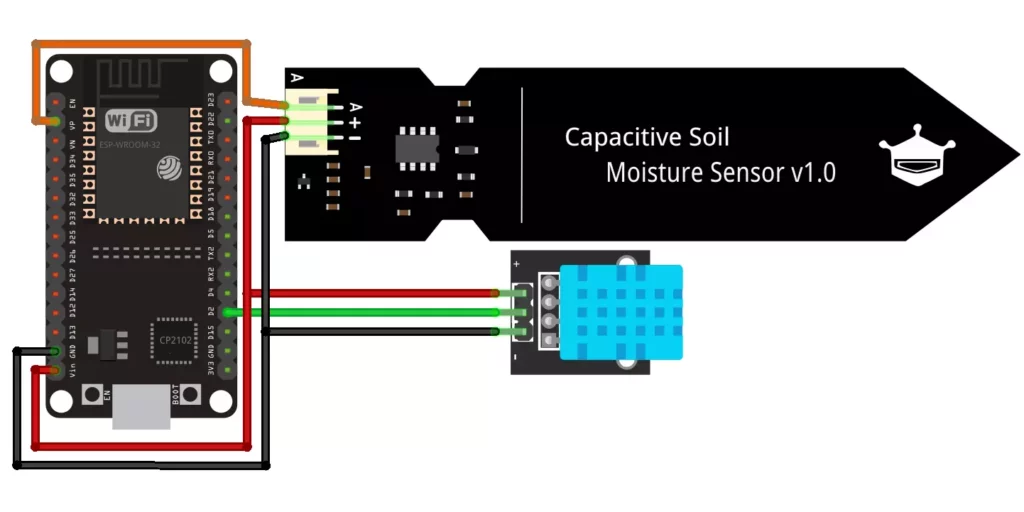
Circuit Diagram
Here is the wiring of above circuit:
DHT11 sensor:
- VCC to 5V pin of ESP32
- GND to GND of ESP32
- Data pin to GPIO2 of ESP32 (can be any GPIO pin)
Soil moisture sensor:
- VCC to 5V pin of ESP32
- GND to GND of ESP32
- A to GPIO36 (ADC pin of ESP32; you can choose any ADC-compatible pin)
Arduino IDE and Blynk IOT Configuration
- Install the ESP32 board support package for Arduino IDE. Follow the official instructions here.
- Install the necessary libraries:
- Create an account on Blynk IOT platform.
- Configure a new project and channel to receive data.
- Watch this video for understanding configuration.
Code for ESP32
#define BLYNK_TEMPLATE_ID "TMPL3Kl4MBcEl"
#define BLYNK_TEMPLATE_NAME "Environment Monitoring System"
#define BLYNK_AUTH_TOKEN "yw6KwyHTdr4uQZcCF36SOYq5Cb345nOaoHjvGIi"

#define BLYNK_PRINT Serial
#include
#include

#include

char auth[] = BLYNK_AUTH_TOKEN;

char ssid[] = "WiFi Username";  // type your wifi name
char pass[] = "WiFi Password";  // type your wifi password

BlynkTimer timer;

#define DHTPIN 2 //Connect Out pin to D2 in ESP32
#define DHTTYPE DHT11
DHT dht(DHTPIN, DHTTYPE);
#define SensorPin 36 //Connect Out pin to VP/GPIO36 in ESP32
const int dryValue  = 2910;   //you need to replace this value with Value_1
const int wetValue = 1465;  //you need to replace this value with Value_2
//const int SensorPin = 36;

void sendSensor()
{
  /*int soilmoisturevalue = analogRead(A0);
   soilmoisturevalue = map(soilmoisturevalue, 0, 1023, 0, 100);*/
   int value = analogRead(SensorPin);
  //value = map(value,400,1023,100,0);
   int soilMoisturePercent  = map(value, dryValue, wetValue, 0, 100);
  float h = dht.readHumidity();
  float t = dht.readTemperature(); // or dht.readTemperature(true) for Fahrenheit

  if (isnan(h) || isnan(t)) {
    Serial.println("Failed to read from DHT sensor!");
    return;
  }
  // You can send any value at any time.
  // Please don't send more that 10 values per second.
    Blynk.virtualWrite(V0, soilMoisturePercent);
    Blynk.virtualWrite(V1, t);
    Blynk.virtualWrite(V2, h);
    Serial.print("Soil Moisture : ");
    Serial.print(soilMoisturePercent);
    Serial.print("   Temperature : ");
    Serial.print(t);
    Serial.print("    Humidity : ");
    Serial.println(h);
}
void setup()
{

  Serial.begin(115200);

  Blynk.begin(auth, ssid, pass);
  dht.begin();
  timer.setInterval(100L, sendSensor);

  }

void loop()
{
  Blynk.run();
  timer.run();
 }
This is the code for Environment Monitoring System using ESP32 to measure and report soil moisture, temperature, and humidity. It sends the data to the Blynk platform for remote monitoring via a mobile or web app. Here’s a detailed breakdown:
Preprocessor Directives
- These lines define the Blynk template information and the authentication token.
- The
BLYNK_TEMPLATE_IDandBLYNK_TEMPLATE_NAMEidentify the project on the Blynk cloud server. BLYNK_AUTH_TOKENis the key used to authenticate the device with the Blynk server.
Library Inclusions
WiFi.h: Allows the ESP32 to connect to a WiFi network.BlynkSimpleEsp32.h: Provides Blynk’s ESP32 support for communication with the server.DHT.h: Enables communication with the DHT sensor for temperature and humidity readings.
WiFi and Blynk Credentials
auth[]: The authentication token for the Blynk project.ssid[]andpass[]: WiFi credentials to connect the ESP32 to the internet.
Timer for Regular Data Sending
BlynkTimeris used to schedule tasks (e.g., sending sensor data periodically).
DHT Sensor Initialization
- Defines the pin connected to the DHT sensor (
DHTPIN = 4) and the sensor type (DHT11). - Creates a
DHTobject to interact with the sensor.
Soil Moisture Sensor Setup
SensorPin: The ESP32 analog pin connected to the soil moisture sensor.dryValueandwetValue: Calibrated sensor values. Replace these with the actual values obtained during calibration:dryValue: Reading when the soil is completely dry.wetValue: Reading when the soil is completely wet.
Functions
- Reads data from the soil moisture sensor (
analogRead) and maps it to a percentage (0% for dry, 100% for wet). - Reads temperature and humidity from the DHT sensor.
- If the DHT sensor fails, it logs an error message (
isnancheck). - Sends the sensor data to the Blynk app using virtual pins:
V0: Soil moisture percentage.V1: Temperature.V2: Humidity.
- Logs the sensor readings to the Serial Monitor for debugging.
setup()
- Initializes:
- Serial communication for debugging.
- Blynk connection using the provided authentication token and WiFi credentials.
- DHT sensor.
- Timer to call
sendSensor()every 100ms.
loop()
- Keeps the Blynk connection alive with
Blynk.run(). - Executes scheduled tasks using
timer.run().
Working Mechanism
- Initialization:
- ESP32 connects to the WiFi network and the Blynk server.
- The DHT and soil moisture sensors are initialized.
- Sensor Reading:
- The
sendSensor()function is called every 1000ms. - Reads soil moisture, temperature, and humidity values.
- The
- Data Transmission:
- Sends the sensor data to the Blynk app using virtual pins.
- Displays data on the Serial Monitor.
- User Monitoring:
- The user can view real-time soil moisture, temperature, and humidity in the Blynk app.
Key Notes
- Calibration:
- Ensure
dryValueandwetValueare calibrated for your soil moisture sensor.
- Ensure
- WiFi Credentials:
- Replace
"WiFi Username"and"WiFi Password"with your actual WiFi credentials.
- Replace
- Power Source:
- Ensure the ESP32 and sensors are powered adequately for reliable operation.
Applications of Soil Moisture Sensor
- Agriculture: Automates irrigation and improves crop yield.
- Gardening: Waters plants in greenhouses or home gardens as needed.
- Environmental Monitoring: Tracks soil health and climate impact.
- Construction: Ensures soil stability for building projects.
- Education: Used in labs and for teaching soil-water relationships.
Applications of DHT11 Sensor
- Home Automation: Controls temperature and humidity in smart homes.
- Weather Monitoring: Collects real-time weather data.
- Industry: Maintains optimal conditions in warehouses and factories.
- Agriculture: Regulates greenhouse climate for plant growth.
- Health: Ensures proper indoor air quality in hospitals and labs.
- Gadgets: Built into air purifiers and climate devices.
Environment Monitoring System Applications
- Agriculture: Tracks soil, water, and air for better farming.
- Smart Cities: Monitors air quality and optimizes energy use.
- Disaster Management: Predicts floods, landslides, and wildfires.
- Industry: Tracks emissions and ensures environmental compliance.
- Research: Studies climate and ecosystems.
- Water Monitoring: Measures pollution and ensures clean water.
- Forestry: Monitors ecosystems and wildlife habitats.
Conclusion
By integrating the DHT11 and soil moisture sensor with Arduino or ESP32, you can create a compact and efficient environment monitoring system. Also, you can add water TDS sensor in your project to monitor water TDS. This project serves as a steppingstone for more advanced applications such as automated irrigation systems, greenhouse monitoring, or smart gardening solutions. With IoT integration, you can remotely monitor and analyze environmental conditions, paving the way for smarter, data-driven decision-making.
