
Monitoring the air, we breathe indoors is becoming increasingly important, especially in urban environments where pollution levels can impact our health. In this project, we’ll build a smart Indoor Air Quality Monitoring System using the BME680 environmental sensor, ESP8266 Wi-Fi module, and Blynk IoT platform. This compact setup allows real-time tracking of temperature, humidity, barometric pressure, and indoor air quality (VOC levels) right on your smartphone.
🌐 Project Overview
This IoT-based project utilizes the BME680 sensor to measure environmental conditions and sends the data to the Blynk mobile app via the ESP8266 (NodeMCU or Wemos D1 Mini). With just a few components and minimal coding, you can monitor your room’s air quality from anywhere in the world.
🎯 Features
- Live temperature, humidity, pressure, and air quality data
- Real-time updates every 10 seconds
- Remote monitoring via Blynk mobile app
- Compact and low-power hardware
- Ideal for home, office, or industrial use
🔧 Required Components
| Component | Quantity |
|---|---|
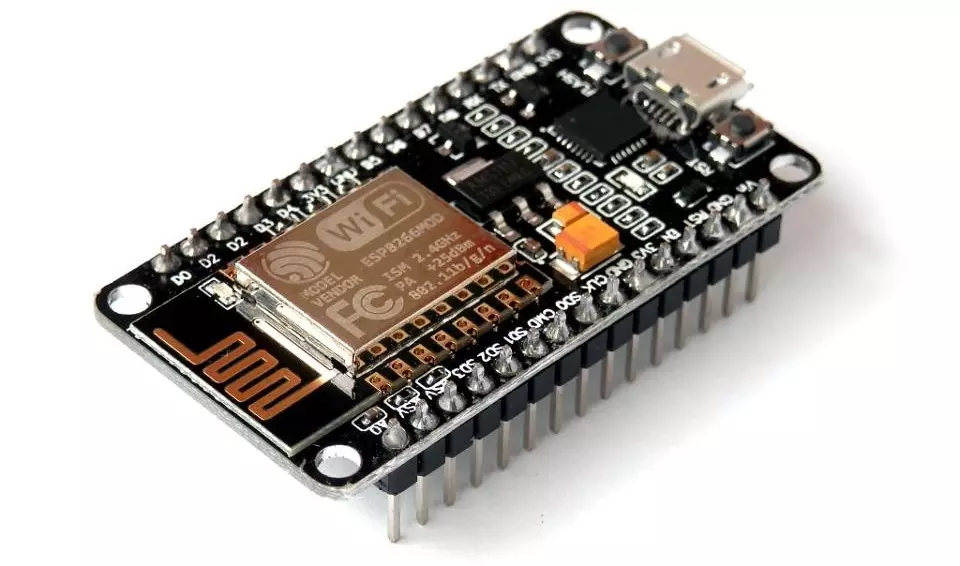
| ESP8266 (NodeMCU / Wemos D1 Mini) | 1 |
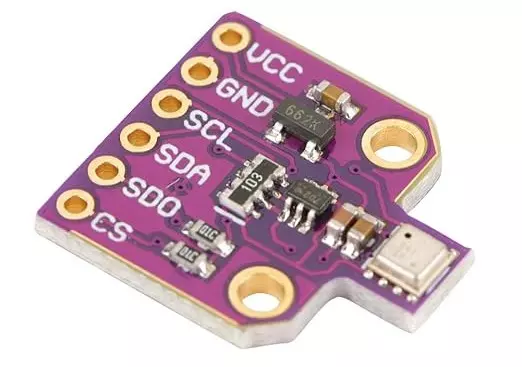
| BME680 Environmental Sensor | 1 |
| Jumper Wires | 1 set |
| Breadboard (optional) | 1 |
| Micro USB Cable | 1 |
| Smartphone with Blynk App | 1 |
🔌 Circuit Diagram
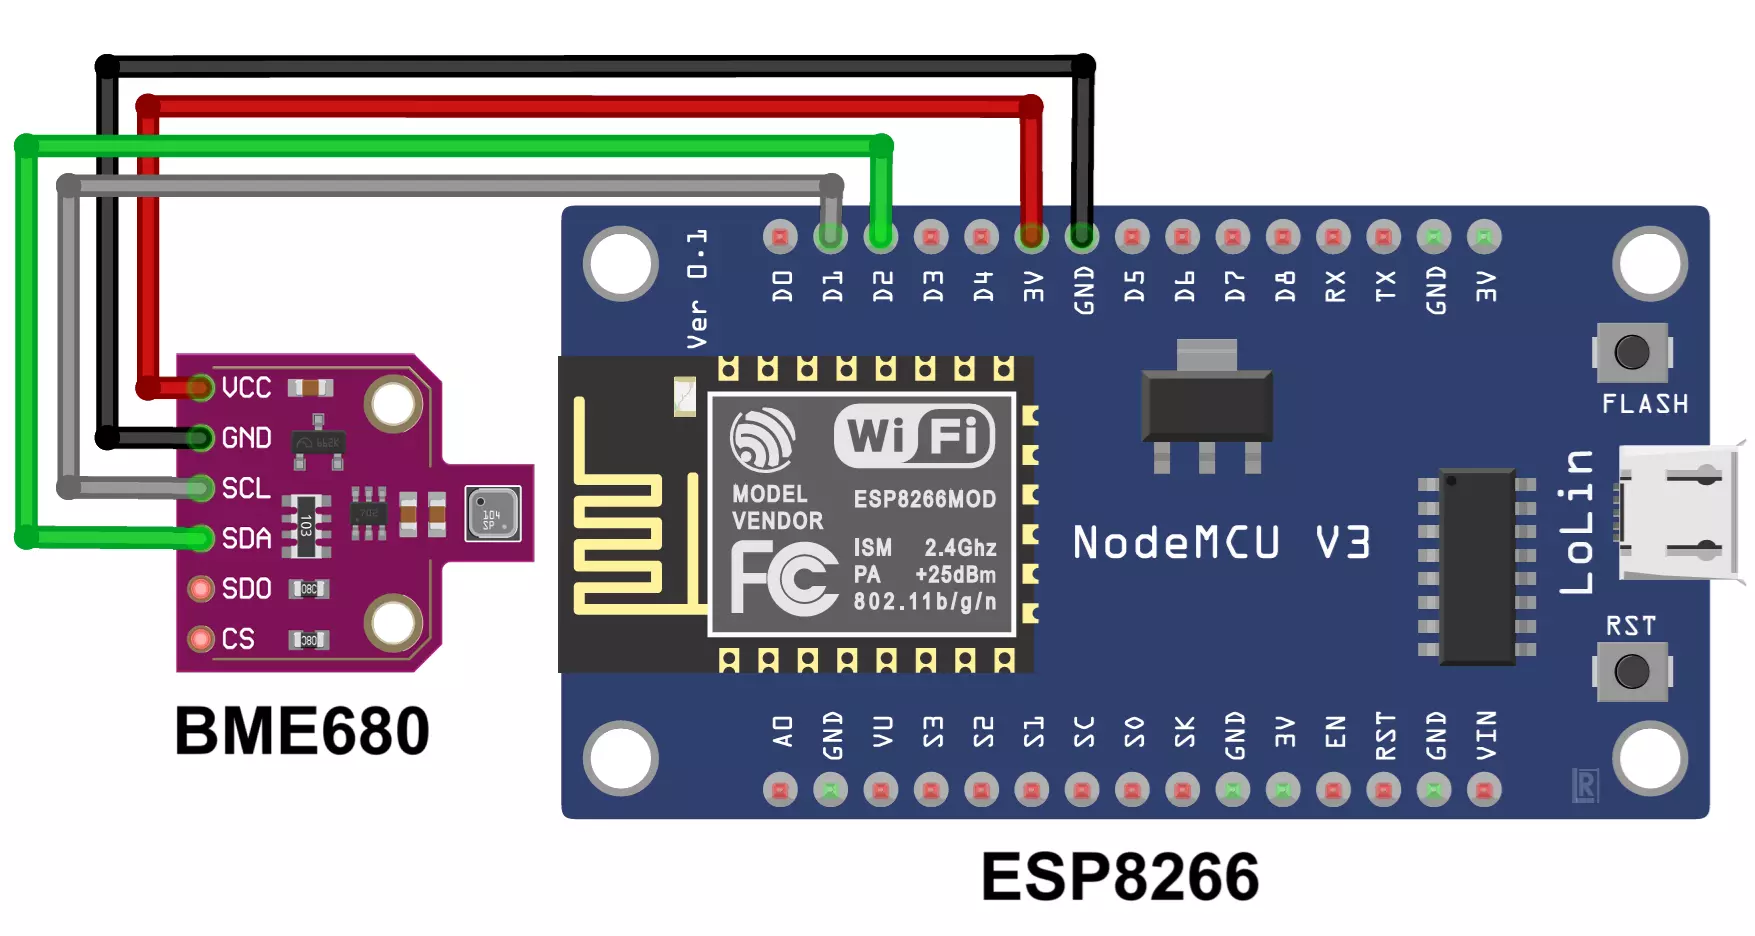
Connections Between BME680 and ESP8266 (I2C):
| BME680 Pin | ESP8266 Pin |
|---|---|
| VCC | 3.3V |
| GND | GND |
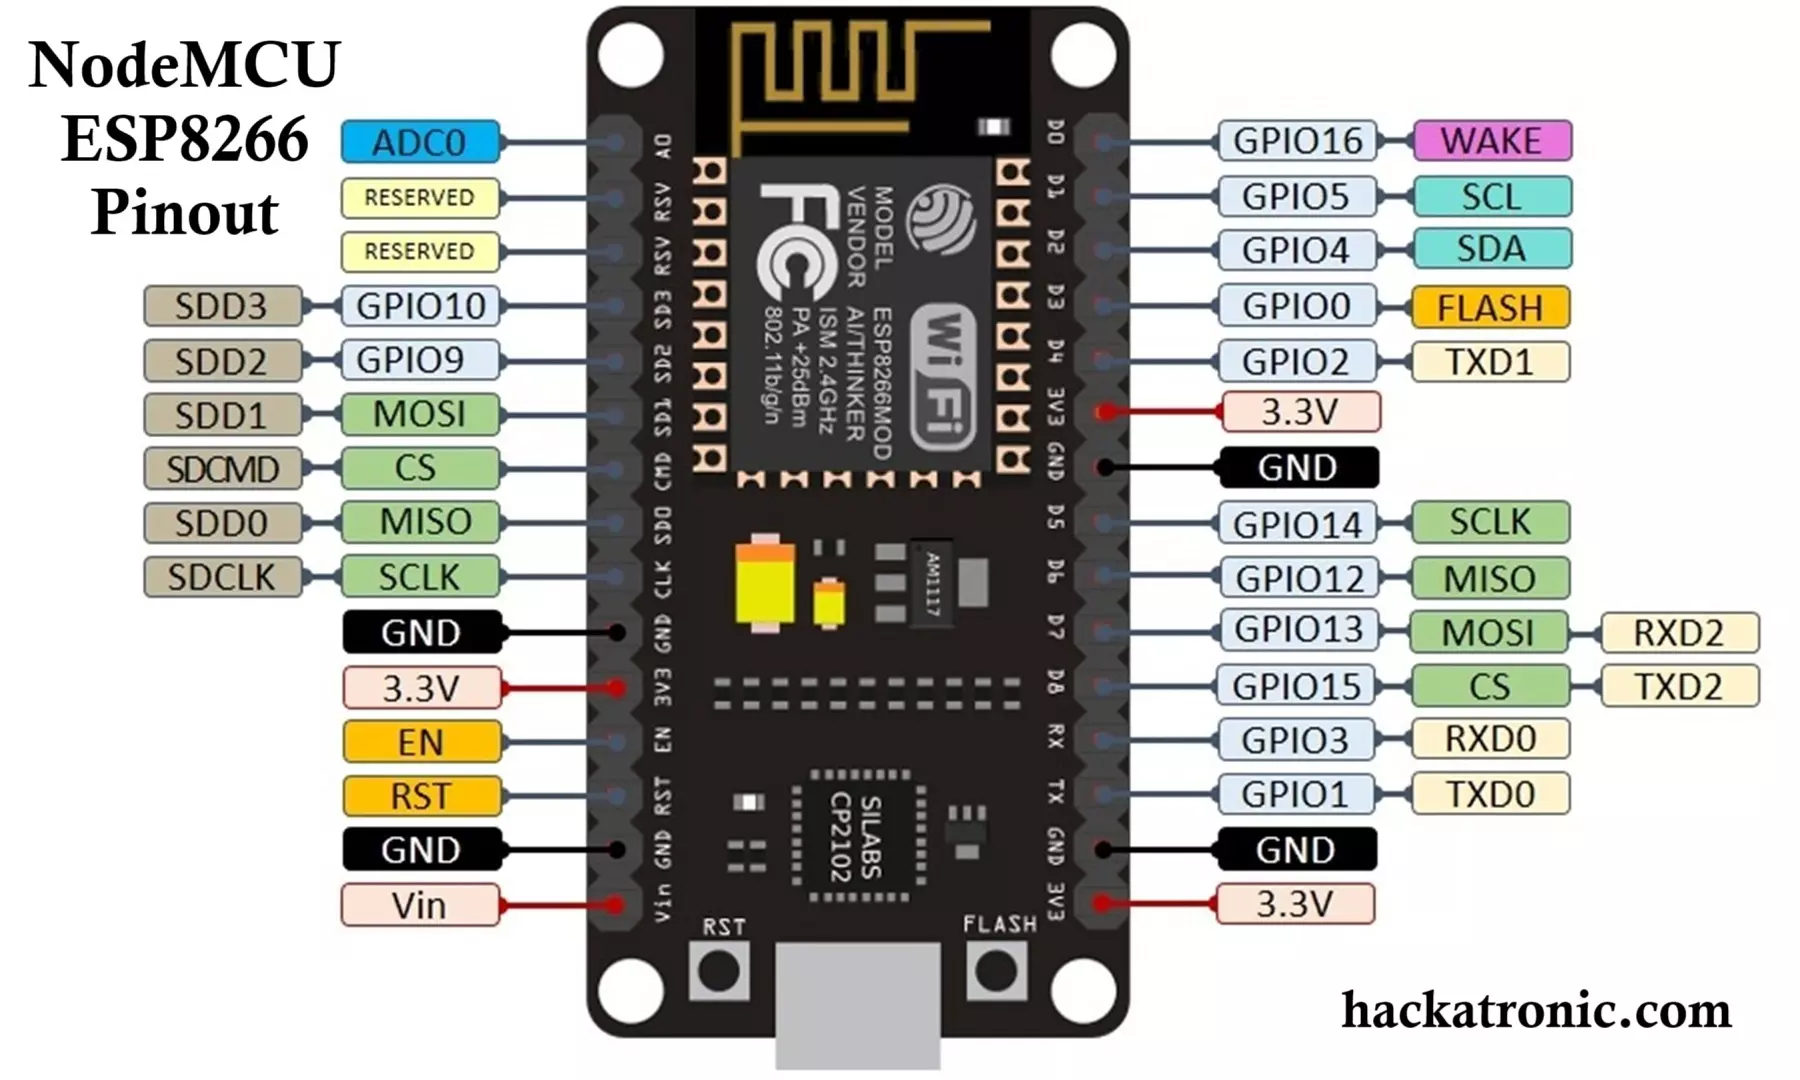
| SDA | D2 (GPIO4) |
| SCL | D1 (GPIO5) |
Make sure your BME680 module is 3.3V compatible.
🧠 How It Works
- BME680 Sensor reads temperature, humidity, pressure, and gas resistance (VOC levels).
- ESP8266 connects to Wi-Fi and sends this data to the Blynk Cloud.
- The Blynk App displays real-time environmental data on your phone using virtual widgets.
IOT Based Air Quality Monitoring System with ESP32 & BME680 Sensor
📲 Blynk Setup
- Install the Blynk App (available on Android and iOS).
- Create a new project and select ESP8266 as the device.
- Note the Auth Token sent to your email.
- Add 4 display widgets:
- V0: Temperature (°C)
- V1: Humidity (%)
- V2: Pressure (hPa)
- V3: Air Quality (kOhms)
- Arrange widgets in a clean layout.
🖥️ Code for ESP8266 Microcontroller
Here’s the complete Arduino IDE sketch for the project:
// Tech Trends Shameer
// IoT-Based Pollution Monitoring System Using ESP8266 and BME680

#define BLYNK_TEMPLATE_ID "TMPL3Uj6HgZ6n"
#define BLYNK_TEMPLATE_NAME "Smart Pollution Monitoring"
#define BLYNK_AUTH_TOKEN "fZDiU5kBUuakFTxxdfhgvudl0IE55Vh0He_"

#define BLYNK_PRINT Serial
#include <Adafruit_Sensor.h>
#include <Adafruit_BME680.h>
#include <ESP8266WiFi.h>
#include <BlynkSimpleEsp8266.h>

char auth[] = BLYNK_AUTH_TOKEN;
char ssid[] = ""; // Enter your Wi-Fi name
char pass[] = ""; // Enter your Wi-Fi password

Adafruit_BME680 bme;
BlynkTimer timer;

void setup() {
    Serial.begin(115200);

    WiFi.begin(ssid, pass);
    while (WiFi.status() != WL_CONNECTED) {
        delay(1000);
        Serial.println("Connecting to WiFi...");
    }
    Serial.println("Connected to WiFi!");

    Blynk.begin(auth, ssid, pass);

    if (!bme.begin()) {
        Serial.println("Could not find a valid BME680 sensor!");
        while (1);
    }

    bme.setTemperatureOversampling(BME680_OS_8X);
    bme.setHumidityOversampling(BME680_OS_2X);
    bme.setPressureOversampling(BME680_OS_4X);
    bme.setGasHeater(320, 150); // Heater at 320°C for 150ms

    timer.setInterval(10000L, sendSensorData);
}

void sendSensorData() {
    if (!bme.performReading()) {
        Serial.println("Failed to read BME680 sensor!");
        return;
    }

    float temp = bme.temperature;
    float hum = bme.humidity;
    float press = bme.pressure / 100.0;
    float air_quality = bme.gas_resistance / 1000.0;

    Serial.print("Temperature: "); Serial.print(temp); Serial.println("°C");
    Serial.print("Humidity: "); Serial.print(hum); Serial.println("%");
    Serial.print("Pressure: "); Serial.print(press); Serial.println("hPa");
    Serial.print("Air Quality (VOC): "); Serial.print(air_quality); Serial.println(" kOhms");

    Blynk.virtualWrite(V0, temp);
    Blynk.virtualWrite(V1, hum);
    Blynk.virtualWrite(V2, press);
    Blynk.virtualWrite(V3, air_quality);
}

void loop() {
    Blynk.run();
    timer.run();
}
Let’s break down the air quality monitoring project code using BME680 sensor, ESP8266 board, and Blynk platform to explain everything clearly:
🔧 Code Overview
This project reads environmental data—temperature, humidity, pressure, and air quality (VOC levels)—using a BME680 sensor and sends it to the Blynk IoT app every 10 seconds over Wi-Fi using an ESP8266 microcontroller.
📦 Libraries and Definitions
#define BLYNK_TEMPLATE_ID ...
#define BLYNK_TEMPLATE_NAME ...
#define BLYNK_AUTH_TOKEN ...
These are Blynk-specific IDs that connect your device to the correct template in the Blynk app.
#define BLYNK_PRINT Serial
#include <Adafruit_Sensor.h>
#include <Adafruit_BME680.h>
#include <ESP8266WiFi.h>
#include <BlynkSimpleEsp8266.h>
Adafruit_Sensor.handAdafruit_BME680.h: Libraries to interact with the BME680 environmental sensor.ESP8266WiFi.h: Lets the ESP8266 connect to Wi-Fi.BlynkSimpleEsp8266.h: Handles communication between your ESP8266 and the Blynk cloud.
🔐 Credentials
char auth[] = BLYNK_AUTH_TOKEN;
char ssid[] = "Your SSID";
char pass[] = "Your Password";
- Replace
ssidandpasswith your Wi-Fi name and password. authis the authentication token from Blynk.
🌡️ Sensor and Timer Initialization
Adafruit_BME680 bme;
BlynkTimer timer;
bme: An object to handle the BME680 sensor.timer: A Blynk helper that helps call functions at regular intervals.
🔁 setup() Function
Serial.begin(115200);
Starts serial communication at 115200 baud rate for debugging.
🌐 Wi-Fi Connection
WiFi.begin(ssid, pass);
while (WiFi.status() != WL_CONNECTED) { ... }
Loops until the ESP8266 connects to the internet.
📲 Blynk Initialization
Blynk.begin(auth, ssid, pass);
Starts the connection to the Blynk cloud using Wi-Fi and the authentication token.
📡 BME680 Sensor Setup
if (!bme.begin()) { ... }
- Initializes the sensor and halts execution if it’s not found.
bme.setTemperatureOversampling(BME680_OS_8X);
bme.setHumidityOversampling(BME680_OS_2X);
bme.setPressureOversampling(BME680_OS_4X);
bme.setGasHeater(320, 150);  // Heater temp = 320°C for 150ms
These settings improve measurement accuracy and enable the gas (VOC) sensor part of the BME680.
⏲️ Data Transmission Timer
timer.setInterval(10000L, sendSensorData);
Calls sendSensorData() every 10 seconds (10000 ms).
📤 sendSensorData() Function
if (!bme.performReading()) { ... }
Checks if the sensor is able to take a new reading.
float temp = bme.temperature;
float hum = bme.humidity;
float press = bme.pressure / 100.0;
float air_quality = bme.gas_resistance / 1000.0;
Reads:
- Temperature in °C
- Humidity in %
- Pressure in hPa
- Air quality (VOC gas resistance) in kOhms (higher = cleaner air)
🔄 Debug Output
Prints all readings to the serial monitor.
📱 Send to Blynk App
Blynk.virtualWrite(V0, temp);
Blynk.virtualWrite(V1, hum);
Blynk.virtualWrite(V2, press);
Blynk.virtualWrite(V3, air_quality);
Sends sensor values to virtual pins V0–V3. In the Blynk app, these can be linked to display widgets like Gauges or Graphs.
🔄 loop() Function
Blynk.run();
timer.run();
- Keeps Blynk connected.
- Runs the timer to ensure periodic updates.
📲 Setting up ESP8266 Board
- Enter your Wi-Fi credentials and Blynk Auth Token.
- Flash this code onto an ESP8266 board (like NodeMCU or Wemos D1 Mini).
- Connect a BME680 sensor to the ESP8266 (typically via I2C).

📊 Sensor Output Interpretation
- Temperature (°C): Measures ambient temperature.
- Humidity (%RH): Shows how moist the air is.
- Pressure (hPa): Useful for weather predictions.
- Air Quality (kΩ): Based on VOC gas resistance — higher = cleaner air.
Note: BME680 does not output AQI directly. The gas resistance value can be used to estimate air quality with additional algorithms or libraries (e.g., Bosch BSEC).
✅ Benefits of This Project
- Affordable and compact solution
- Great for home automation or smart homes
- Helps identify when ventilation is needed
- Can be expanded with alerts, data logging, or integration with home assistants
🚀 Possible Improvements
- Use ESP32 for more power and Bluetooth support
- Integrate Bosch BSEC library for more accurate IAQ (Indoor Air Quality) index
- Add an OLED display for local monitoring
- Send alerts via email or push notification
🏁 Conclusion
With this simple yet powerful setup, you can keep tabs on your indoor environment and take proactive steps to improve air quality. Whether you want to monitor a bedroom, lab, office, or workshop — this BME680 + ESP8266 IoT Air Quality Monitor is a smart addition to your living space.
IOT Based Air Quality Monitoring System with ESP32 & BME680 Sensor
Interfacing DHT11 + Soil Moisture Sensor with Arduino & ESP32