Let’s see how to interface rain sensor with Arduino, a rain sensor, also known as a rain switch or rain detector, is a device used in various applications to detect the presence of rain and trigger a response.
The basic principle behind a rain sensor involves detecting changes in conductivity or capacitance caused by the presence of water droplets on the sensor surface. This triggers a signal that informs the system to take appropriate action, such as turning on wipers or activating an alarm.
In automotive systems, rain sensors are commonly used in vehicles to automatically activate windshield wipers when it starts to rain.
Working of Rain Sensor Module:
A rain sensor module is a device used to detect rain or water presence and trigger certain actions or alarms accordingly. Here’s rain sensor working principle, how it typically works:
Sensor Principle: Rain sensor modules usually employ a simple principle of conductivity. They consist of a small circuit with two conductive elements separated by a non-conductive space. When water droplets bridge these conductive elements, they complete an electrical circuit.
Conductive Surface: The sensor typically has a conductive surface, often made of copper or other conductive materials. This surface is exposed to the environment and collects raindrops.
Measurement: When rain falls on the conductive surface, it forms a conductive path between the two elements of the sensor. This alters the resistance or conductivity of the sensor, which can be measured.
Threshold Detection: The module usually has a threshold level set to determine when it considers the detected water to be significant enough to be considered as “rain.” This threshold level can be adjusted based on the sensitivity required.
Output: Depending on the design and purpose of the rain sensor, it can have various outputs. Commonly, it provides a digital output signal (like HIGH/LOW) or an analog signal (like varying voltage or resistance) to indicate the presence or intensity of rain.
Control Interface: Rain sensor modules often integrate with microcontrollers or other control systems. These systems interpret the output signal from the sensor and trigger actions accordingly. For instance, they can activate windshield wipers in automobiles, control irrigation systems, or send alerts in weather monitoring systems.
Calibration: Some rain sensor modules may require calibration to adjust sensitivity or to account for environmental factors. Calibration ensures accurate detection and reliable operation.
Power Requirements: Typically, rain sensor modules are low-power devices and can operate on low voltage, making them suitable for battery-powered applications.
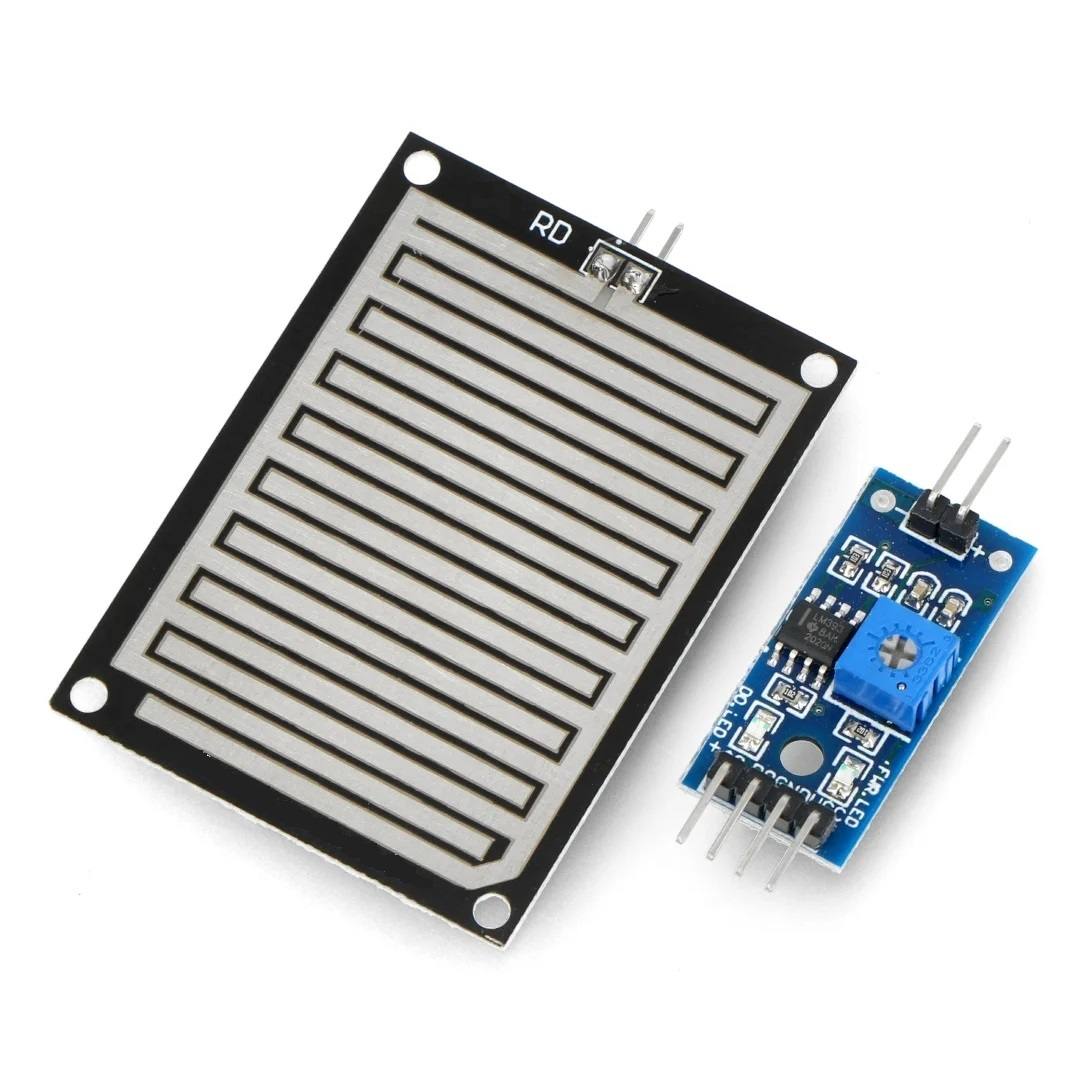
YL-83 Rain Sensor Module:
The rain sensor module/board, depicted below, comprises nickel-coated lines and operates on the resistance principle. It detects moisture through analog output pins, providing a digital output when the moisture threshold is exceeded.
This module resembles the LM393 IC, integrating an electronic module and a PCB. The PCB serves to collect raindrops, creating a parallel resistance path when rain falls on it, which is then calculated through the operational amplifier.
Rain Sensor Module
Functioning as a resistive dipole, the sensor’s resistance varies based on moisture levels. It exhibits higher resistance when dry and lower resistance when wet.
Pin Configuration:
Most rain sensors are pre-built modules with two output options: digital and analog.
VCC (Pin 1): Connects to a 5V DC power supply.
GND (Pin 2): Ground connection.
DO (Pin 3): Provides Digital Output a simple HIGH or LOW signal based on a set moisture threshold.
AO (Pin 4): Offers Analog Output a voltage range that varies depending on the amount of water detected.
Specifications:
Made with high-quality double-sided material.
Sensitivity adjustable via a potentiometer.
Operating voltage: 5V.
Compact PCB size: 3.2cm x 1.4cm.
Bolt holes provided for easy installation.
Uses LM393 comparator with a wide voltage range.
Comparator output delivers a clean waveform with a driving capacity exceeding 15mA.
Resistant to conductivity and oxidation for durability.
Sensor area: 5cm x 4cm with nickel plating.
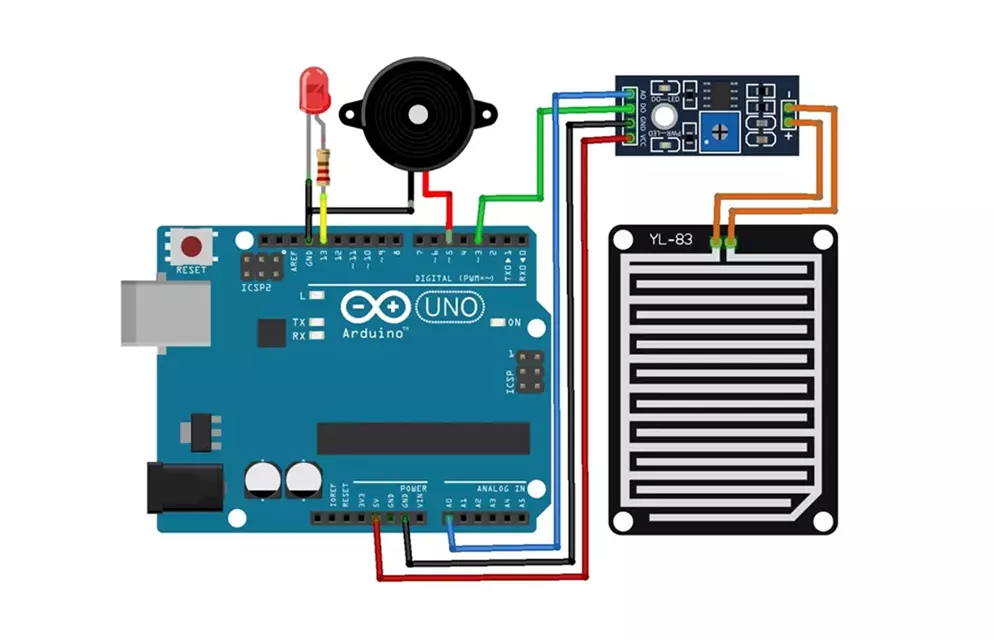
Interface Rain Detection Sensor with Arduino:
Components:
Arduino board (Uno, Nano, etc.)
Rain sensor module
Jumper wires
LED, buzzer, or other output device
Connections:
Power: Connect the VCC pin of the rain sensor to the 5V pin of the Arduino. Connect the GND pin of the sensor to the GND pin of the Arduino.
Output:
Digital Output: Connect the DOUT or SIG pin of the sensor to a digital pin on the Arduino (e.g., pin 2).
Analog Output: Connect the AOUT or AO pin of the sensor to an analog input pin on the Arduino (e.g., A0).
Arduino Program:
Here is Arduino sketch to detect rain using a raindrop sensor module, and then control an LED and a buzzer accordingly.
// Define pin numbersconstint sensorPin = 2; // Raindrop sensor moduleconstint ledPin = 3; // LEDconstint buzzerPin = 4; // Buzzervoidsetup(){
pinMode(sensorPin, INPUT); // Set sensorPin as inputpinMode(ledPin, OUTPUT); // Set ledPin as outputpinMode(buzzerPin, OUTPUT); // Set buzzerPin as output
Serial.begin(9600); // Start serial communication at 9600 baud rate
}
voidloop(){
int sensorState = digitalRead(sensorPin); // Read the digital value from the sensorif(sensorState == HIGH) // No rain detected
{
digitalWrite(ledPin, LOW); // Turn LED OFFnoTone(buzzerPin); // Stop playing any tone on the buzzer
}
else// Rain detected
{
digitalWrite(ledPin, HIGH); // Turn LED ONtone(buzzerPin, 1000); // Play a tone at 1000 Hz on the buzzer
}
Serial.println(sensorState); // Print the sensor state to the serial monitordelay(50);
}
Here’s what the code does:
It initializes three pins for the sensor, LED, and buzzer.
In the loop() function, it reads the state of the raindrop sensor.
If rain is not detected (sensor state is HIGH), it turns off the LED and stops any tone on the buzzer.
If rain is detected (sensor state is LOW), it turns on the LED and plays a tone on the buzzer.
It prints the sensor state to the serial monitor for debugging purposes.
This code should work fine for your project!
Rain Sensor Module with Arduino
The Arduino code will depend on the type of output your rain sensor uses. Here’s a basic example for both:
Digital Output:
int rainPin = 2; // Digital pin connected to rain sensor outputvoidsetup(){
pinMode(rainPin, INPUT); // Set rainPin as input
Serial.begin(9600); // Initialize serial communication
}
voidloop(){
int rainStatus = digitalRead(rainPin);
if (rainStatus == LOW) {
Serial.println("Rain detected!");
// Add code to control output device (LED, buzzer, etc.)
} else {
Serial.println("No rain detected.");
}
delay(500); // Delay between checks
}
int sensorPin = A0; // Analog pin connected to rain sensor outputint threshold = 300; // Adjust based on sensor and desired sensitivityvoidsetup(){
Serial.begin(9600); // Initialize serial communication
}
voidloop(){
int sensorValue = analogRead(sensorPin);
if (sensorValue < threshold) {
Serial.println("Heavy rain!");
// Add code to control output device (LED, buzzer, etc.)
} else {
Serial.println("Light rain or no rain.");
}
delay(500); // Delay between checks
}
Calibrate the digital output threshold with a potentiometer on the sensor module (if available).
Adjust the analog output threshold in the code based on your sensor and desired rain detection level.
The provided code examples use the Serial Monitor to display rain status. You can modify it to control LEDs, buzzers, send notifications, etc.
Application of Rain Sensor:
Rain sensors module find applications in various fields, primarily for detecting rain or moisture. here are some common applications:
Automatic Irrigation Systems: Rain sensors are used in automated irrigation systems to prevent watering plants during or after rainfall, thus conserving water and preventing overwatering.
Weather Stations: They are used in weather monitoring stations to detect rainfall. This information is crucial for weather forecasting and analysis.
Smart Gardening Systems: Rain sensors can be integrated into smart gardening systems to monitor soil moisture levels and adjust watering schedules accordingly.
Automatic Car Wipers: In automobiles, rain sensors are used to automatically control windshield wipers. They detect raindrops on the windshield and adjust the wiper speed accordingly.
Home Automation: Rain sensors can be incorporated into home automation systems to close windows or retract awnings when it starts raining.
Greenhouses: In greenhouses, rain sensors help monitor humidity levels and control the irrigation system to maintain optimal growing conditions for plants.
Industrial Applications: Rain sensors can be used in industrial settings to detect leaks or spills, triggering alarms or shutting down processes to prevent damage.
Water Management: Rain sensors play a vital role in water management systems, helping to monitor rainfall patterns and manage water resources effectively.
Environmental Monitoring: They are used in environmental monitoring systems to track precipitation levels in specific regions over time.
Safety Systems: Rain sensors are used in road safety systems to detect wet road conditions, triggering warning signs or adjusting traffic signals to improve safety during rainy weather.
Overall, rain sensors contribute to resource conservation, improved safety, and efficiency in various applications across different industries.