Let’s get started with how to build a smart Water Quality Monitoring System using TDS sensor and ESP32 or Arduino. A TDS (Total Dissolved Solids) Sensor measures the total amount of dissolved solids in a liquid, typically water. Dissolved solids include inorganic salts and small organic substances. The measurement is expressed in parts per million (ppm) or milligrams per liter (mg/L).
TDS is an essential parameter for assessing water quality. A high TDS value may indicate contamination, while a very low value might suggest a lack of essential minerals.

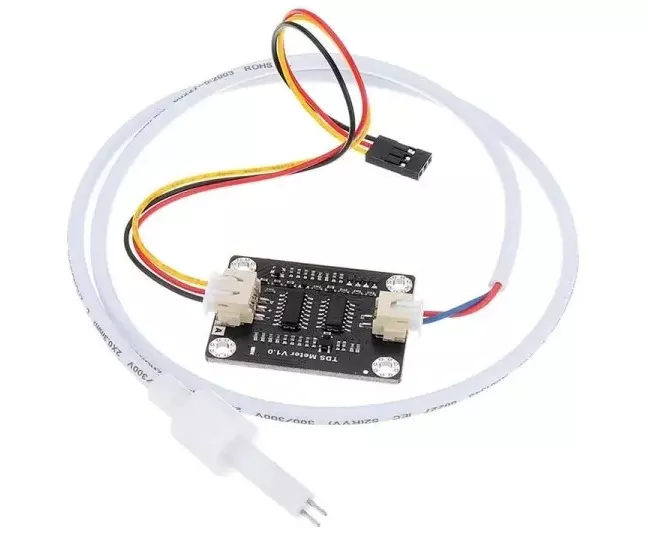
Gravity Analog TDS Sensor
The Gravity Analog TDS Sensor is an Arduino-compatible kit designed for measuring Total Dissolved Solids (TDS) in water. Suitable for domestic water, hydroponics, and other water quality testing applications, it supports a wide input voltage range (3.3–5.5V) and outputs an analog signal (0–2.3V), making it compatible with both 3.3V and 5V control systems.
Key Features
- Uses an AC signal to prevent probe polarization, increasing probe lifespan and signal stability.
- Waterproof TDS probe supports extended immersion for consistent measurements.
Specifications
- Input Voltage: 3.3–5.5V
- Output Voltage: 0–2.3V
- Current: 3–6mA
- TDS Range: 0–1000 ppm
- Accuracy: ±10% FS (at 25°C)
- Probe: 2-needle, waterproof
Usage Tips
- Temperature Limit: Do not use in water above 55°C.
- Placement: Avoid placing the probe near the container’s edge to maintain accuracy.
- Waterproofing: Only the probe head and cable are waterproof; the connector and transmitter board are not.
Components of TDS Sensor
- Probe/Electrodes: Submersible electrodes measure the conductivity of the solution.
- Signal Conditioning Circuit: Converts the electrical conductivity into a TDS value.
- Output: Generally, provides an analog voltage proportional to the TDS.
Working Principle of TDS Sensor
- Conductivity Measurement: TDS sensors measure the electrical conductivity (EC) of water. Dissolved solids like salts, minerals, and ions increase conductivity.
- Conversion to TDS: The measured EC value is converted into TDS using a conversion factor. The factor depends on the specific solution but is typically around 0.5–0.8.
Applications of TDS Sensors
- Water Purification Systems: Monitoring drinking water quality to ensure safety.
- Aquaculture: Ensuring suitable water conditions for aquatic life.
- Agriculture: Managing water quality for irrigation in hydroponics.
- Industrial Processes: Maintaining appropriate TDS levels for machinery and processes.
Water Quality Monitoring System by TDS sensor
You can combine the TDS sensor with other sensors (e.g., temperature sensor) to create a comprehensive water quality monitoring system. With further integration, you can send the data to IoT platforms for real-time monitoring and analysis.
Hardware Required
- ESP32 or Arduino development board
- TDS sensor module (e.g., Gravity TDS Sensor)
- Water container
- Jumper wires
- Power source (5V from USB cable)
- A display module (optional, e.g., OLED or LCD)
- Laptop with Arduino IDE
Interfacing TDS Sensor with Arduino
Interfacing a TDS sensor with Arduino is straightforward and requires basic connections. Below are the steps to set up the sensor and read TDS values.

Circuit Diagram and Connections:
-
- Connect the VCC of the TDS module to the 3.3V pin of Arduino.
- Connect the GND of the TDS module to the GND pin of Arduino.
- Connect the Signal Output (AOUT) of the TDS module to an Analog pin (e.g., A0) on the Arduino.
- Connect 16×2 LCD module to Arduino using I2C converter module.
Arduino Code
Here’s the code to read and display TDS values on LCD display:
#include <Wire.h>
#include <LiquidCrystal_I2C.h>

// Initialize the I2C LCD (address 0x27, 16 columns, 2 rows)
LiquidCrystal_I2C lcd(0x27, 16, 2);

// Define the TDS sensor pin
const int TDS_PIN = A0;

// Define calibration constant (adjust as per your sensor and setup)
float calibrationConstant = 0.5; // Specific to your sensor module

// Supply voltage for the TDS sensor (3.3V in this case)
float supplyVoltage = 3.3;

void setup() {
// Initialize the LCD
lcd.begin(16,2);
lcd.backlight();

// Display a startup message
lcd.setCursor(0, 0);
lcd.print("TDS Sensor Test");
lcd.setCursor(0, 1);
lcd.print("Initializing...");
delay(2000); // Wait for 2 seconds

// Clear the display
lcd.clear();

// Set up serial communication for debugging (optional)
Serial.begin(9600);
}

void loop() {
// Read the analog value from the TDS sensor
int analogValue = analogRead(TDS_PIN);

// Convert the analog value to voltage
float voltage = analogValue * (supplyVoltage / 1023.0);

// Calculate the TDS value in ppm
float tdsValue = (voltage / calibrationConstant) * 1000;

// Display the TDS value on the LCD
lcd.setCursor(0, 0);
lcd.print("TDS: ");
lcd.print(tdsValue, 1); // Display with 1 decimal place
lcd.print(" ppm");

// Print TDS value to Serial Monitor (optional)
Serial.print("TDS Value: ");
Serial.print(tdsValue, 1);
Serial.println(" ppm");

// Add a delay before the next reading
delay(1000); // 1-second delay
}
Calibrating the Sensor
Calibration ensures accuracy. To calibrate:
- Use a reference solution with a known TDS value (e.g., 342 ppm).
- Adjust the
calibrationConstantin the code to match the sensor’s reading with the reference.
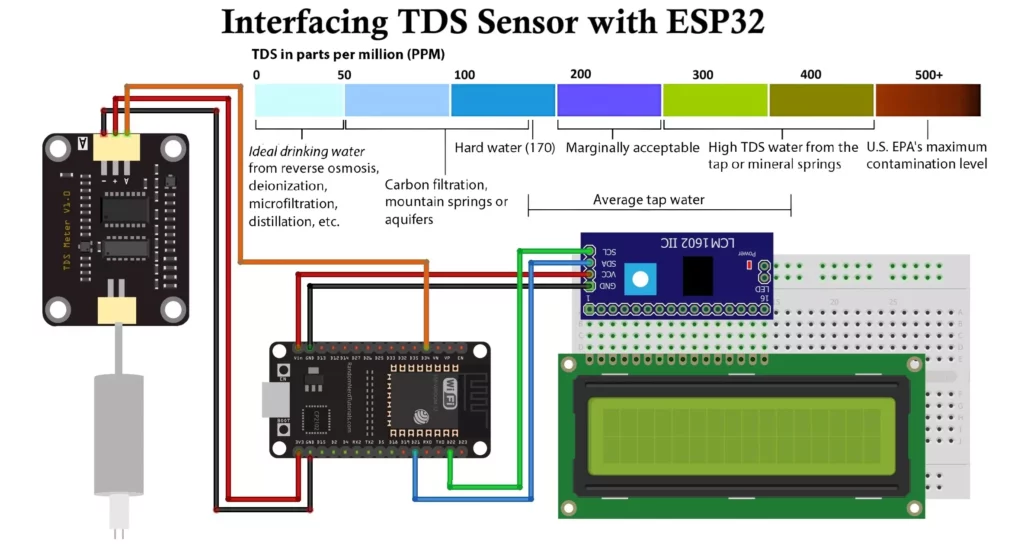
Interfacing TDS Sensor with ESP32
The ESP32 microcontroller is a powerful, Wi-Fi-enabled chip ideal for IoT applications. You can use it to read TDS values and transmit the data for monitoring or logging.

Circuit Diagram and Connections
- Connect the TDS probe to the TDS sensor module.
- Connect the module’s analog output to an analog pin on the ESP32 (e.g., GPIO34).
- Provide power to the TDS module from the ESP32’s 3.3V pin.
- Connect the ground of the TDS module to the ESP32’s GND.
- Connect 16×2 LCD module to ESP32 using I2C converter module as shown.
Features of Water Quality Monitoring System
- Display Module: OLED or LCD to show TDS values locally.
- IoT Integration: Sending TDS data to a cloud server or mobile app using ESP32’s Wi-Fi capabilities.
- Alerts: You can program the ESP32 to trigger alerts if TDS exceeds a specific threshold.
Software Implementation
Follow these steps to program the ESP32:
1. Install the Required Libraries
- Install the ESP32 board package in Arduino IDE.
- Install libraries for display modules if using.
- Got to blynk.io create you application as shown in the video.
- Add your credentials to code and upload to the ESP32 board.
Watch this video for better understanding

2. Code for Reading TDS Sensor
#define BLYNK_TEMPLATE_ID "YOUR_TEMPLATE_ID"
#define BLYNK_TEMPLATE_NAME "Water Quality Monitoring"
#define BLYNK_AUTH_TOKEN "YOUR_AUTH_TOKEN"

// Comment this out to disable prints and save space
#define BLYNK_PRINT Serial
#include <BlynkSimpleEsp32.h>
#include <WiFi.h>

#include <WiFiClient.h>
#include <LiquidCrystal_I2C.h>

// LCD configuration
LiquidCrystal_I2C lcd(0x27, 16, 2);

// Your WiFi credentials.
// Set password to "" for open networks.
char ssid[] = "WiFi Username";
char pass[] = "WiFi Password";

char auth[] = BLYNK_AUTH_TOKEN;

namespace pin {
const byte tds_sensor = 34;
}

namespace device {
float aref = 3.3; // Vref, this is for 3.3v compatible controller boards, for Arduino use 5.0v.
}

namespace sensor {
float ec = 0;
unsigned int tds = 0;
float ecCalibration = 1;
}

void setup() {
Serial.begin(115200); // Debugging on hardware Serial 0
Blynk.begin(auth, ssid, pass);
// Initialize LCD
lcd.init();
lcd.backlight();
// Display "Tech Trends Shameer"
lcd.setCursor(3, 0);
lcd.print("Tech Trends ");
lcd.setCursor(3, 1);
lcd.print(" Shameer ");
delay(2000); // Wait for 3 seconds
// Clear the LCD and display "Water Quality Monitoring"
lcd.clear();
lcd.setCursor(1, 0);
lcd.print("Water Quality");
lcd.setCursor(3, 1);
lcd.print("Monitoring ");
lcd.setCursor(12, 0); // Adjust the position for the heart symbol

delay(2000);
lcd.clear();

}

void loop() {
Blynk.run();
readTdsQuick();
delay(1000);
}

void readTdsQuick() {
// Read the raw analog value and convert to voltage
float rawEc = analogRead(pin::tds_sensor) * device::aref / 1024.0;

// Debugging: Print the raw analog value
Serial.print(F("Raw Analog Value: "));
Serial.println(rawEc);

// Adjust this offset based on the sensor's dry reading (without immersion)
float offset = 0.14; // Set this to the observed raw analog value in air

// Apply calibration and offset compensation
sensor::ec = (rawEc * sensor::ecCalibration) - offset;

// If the EC is below zero after adjustment, set it to zero
if (sensor::ec < 0) sensor::ec = 0;

// Convert voltage value to TDS value using a cubic equation
sensor::tds = (133.42 * pow(sensor::ec, 3) - 255.86 * sensor::ec * sensor::ec + 857.39 * sensor::ec) * 0.5;

// Debugging: Print the TDS and EC values
Serial.print(F("TDS: "));
Serial.println(sensor::tds);
Serial.print(F("EC: "));
Serial.println(sensor::ec, 2);
lcd.setCursor(0, 0);
lcd.print("TDS: ");

lcd.setCursor(4,0);
lcd.print(sensor::tds);

lcd.setCursor(0,1);
lcd.print("EC: ");

lcd.setCursor(4,1);
lcd.print(sensor::ec);

// Send data to Blynk virtual pins
Blynk.virtualWrite(V0, sensor::tds);
Blynk.virtualWrite(V1, sensor::ec);
}
Steps to Run the Program
- Connect the ESP32 to your computer via USB.
- Open Arduino IDE and load the above code.
- Select the correct board (ESP32 Dev Module) and port in Tools.
- Upload the code.
- Open the blynk.io application to see the TDS readings in ppm.
Calibration
To ensure accurate readings:
- Use a TDS calibration solution of known ppm (e.g., 200 ppm).
- Adjust the calibration factor in the code based on the observed readings until it matches the known TDS value.
Tips for Accurate Readings
- Ensure the probe is clean and free from debris.
- Do not immerse the probe’s entire module—only the sensor tip should be in water.
- Avoid using the sensor in high-temperature or corrosive environments.
- Stabilize the water sample before taking readings for better accuracy.
- Use a proper power supply to avoid noise in the readings.
Conclusion:
A TDS sensor, when interfaced with an ESP32 or Arduino, provides a versatile and efficient solution for real-time water quality monitoring. It simplifies the measurement and monitoring of TDS levels for environmental, agricultural, and industrial purposes. It is ideal for applications such as home aquariums and industrial water treatment systems. TDS sensor is useful in advanced and reliable water quality monitoring systems for a wide range of needs.