Creating project like air quality monitoring system is a great way to keep track of environmental conditions in your area. This article will help you through the steps of setting up a system using the XIAO ESP32C6 board, various sensors, and the Blynk IoT platform. Here’s a detailed breakdown of the components and steps involved. Here we have used ESP32C6 you can use other variant of ESP32 by doing required changes in the program.
Here we are including humidity and temperature parameters you can add other parameters like pressure, wind speed etc. if you want.
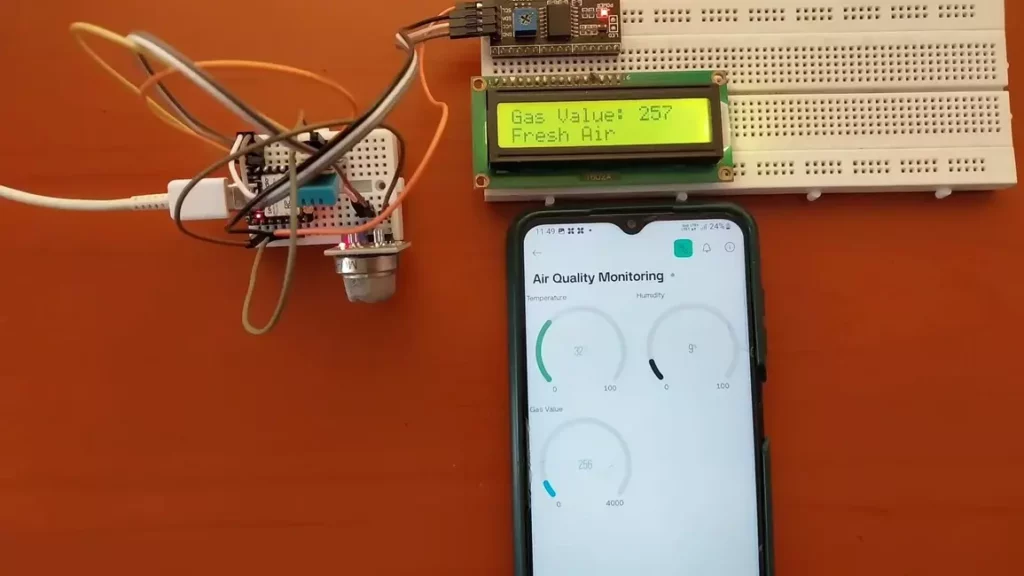
Watch this video for better understanding:

Components Required:
- XIAO ESP32C6 board
- MQ135 Air Quality Sensor
- DHD11 Temperature and Humidity Sensor
- LCD Display with I2C Converter
- Breadboard
- Connecting Cables and Wires
Instructions to setup Air Quality Monitoring System:
1. Hardware Setup
- Connect the MQ135 sensor to A0 pin of the XIAO ESP32C6 board.
- Connect the DHD11 sensor to D2 pin of the board.
- Connect the LCD display to the board via the I2C converter.
- Assemble the components on the breadboard using connecting cables and wires.

2. Blynk IoT Configuration
- Log in to the Blynk Cloud website.
- Navigate to Developers and click on “New Template”.
- Create a New Template:
- Template Name: Air Quality Monitoring
- Hardware: ESP32
- Connection Type: Wi-Fi
- Click Done to create the template.
3. Setting Up Data Streams
- Go to Data Streams and click on “New Data Stream”.
- Create Data Streams:
- Temperature Data Stream:
- Name: Temperature
- Pin: Virtual pin V0
- Data Type: Double
- Max Value: 100
- Unit: Celsius
- Humidity Data Stream:
- Name: Humidity
- Pin: Virtual pin V1
- Data Type: Double
- Max Value: 100
- Unit: Percentage
- Air Quality Data Stream:
- Name: Air Quality
- Pin: Virtual pin V2
- Data Type: Double
- Max Value: 4000
- Unit: PPM (Parts Per Million)
- Temperature Data Stream:
4. Configuring Web Dashboard
- Add Gauge Widgets for displaying data.
- Configure Gauge Widgets:
- First Gauge: Data Stream – Temperature, customize color and click Save.
- Second Gauge: Data Stream – Humidity, customize color and click Save.
- Third Gauge: Data Stream – Air Quality, customize color and click Save.
5. Setting Up Events and Notifications
- Go to Events and Notifications and create a new event.
- Create Event:
- Event Name: Pollution_Alert
- Description: Bad air
- Limit: 1 second
- Enable notifications to show in the mobile app and timeline.
- Set Up Notifications:
- Enable Notifications.
- Select Email to device owner.
- Enable Push Notifications as alerts.
6. Device Setup
- Go to Devices and click “New Device”.
- Select from Template and choose the Air Quality Monitoring template.
- Copy the Template ID, Template Name, and Authentication Token for use in your program.
7. Programming the ESP32
- Select the appropriate board and port in your development environment.
- Add Template ID, Template Name, and Authentication Token in program.
Code for Air Quality Monitoring System Project:
#define BLYNK_TEMPLATE_ID "Your_Temp_ID"
#define BLYNK_TEMPLATE_NAME "Air Quality Monitoring"
#define BLYNK_AUTH_TOKEN "Your_Auth_Token"

#define BLYNK_PRINT Serial
#include <WiFi.h>
#include <BlynkSimpleEsp32.h>

#include <DHT.h>

//#include <Wire.h>
#include <LiquidCrystal_I2C.h>

LiquidCrystal_I2C lcd(0x27, 16, 2);

byte degree_symbol[8] =
{
0b00111,
0b00101,
0b00111,
0b00000,
0b00000,
0b00000,
0b00000,
0b00000
};

char auth[] = BLYNK_AUTH_TOKEN;

char ssid[] = "WiFi Username"; // type your wifi name
char pass[] = "WiFi Password"; // type your wifi password

BlynkTimer timer;

#define gas A0
int sensorThreshold = 100;

#define DHTPIN D2 //Connect Out pin to D2 in NODE MCU
#define DHTTYPE DHT11
DHT dht(DHTPIN, DHTTYPE);


void sendSensor()
{


float h = dht.readHumidity();
float t = dht.readTemperature(); // or dht.readTemperature(true) for Fahrenheit


if (isnan(h) || isnan(t)) {
Serial.println("Failed to read from DHT sensor!");
return;
}
int analogSensor = analogRead(gas);
Blynk.virtualWrite(V2, analogSensor);
Serial.print("Gas Value: ");
Serial.println(analogSensor);
// You can send any value at any time.
// Please don't send more that 10 values per second.
Blynk.virtualWrite(V0, t);
Blynk.virtualWrite(V1, h);

Serial.print("Temperature : ");
Serial.print(t);
Serial.print(" Humidity : ");
Serial.println(h);


}
void setup()
{

Serial.begin(115200);

//pinMode(gas, INPUT);
Blynk.begin(auth, ssid, pass);
dht.begin();
timer.setInterval(30000L, sendSensor);

//Wire.begin();
lcd.begin();


// lcd.backlight();
// lcd.clear();
lcd.setCursor(3,0);
lcd.print("Air Quality");
lcd.setCursor(3,1);
lcd.print("Monitoring");
delay(2000);
lcd.clear();
}

void loop()
{
Blynk.run();
timer.run();
float h = dht.readHumidity();
float t = dht.readTemperature(); // or dht.readTemperature(true) for Fahrenheit
int gasValue = analogRead(gas);
lcd.setCursor(0,0);
lcd.print("Temperature ");
lcd.setCursor(0,1);
lcd.print(t);
lcd.setCursor(6,1);
lcd.write(1);
lcd.createChar(1, degree_symbol);
lcd.setCursor(7,1);
lcd.print("C");
delay(4000);
lcd.clear();
lcd.setCursor(0, 0);
lcd.print("Humidity ");
lcd.print(h);
lcd.print("%");
delay(4000);
lcd.clear();
//lcd.setCursor(0,0);
// lcd.print(gasValue);
// lcd.clear();
Serial.println("Gas Value");
Serial.println(gasValue);
if(gasValue<1200)
{
lcd.setCursor(0,0);
lcd.print("Gas Value: ");
lcd.print(gasValue);
lcd.setCursor(0, 1);
lcd.print("Fresh Air");
Serial.println("Fresh Air");
delay(4000);
lcd.clear();
}
else if(gasValue>1200)
{
lcd.setCursor(0,0);
lcd.print(gasValue);
lcd.setCursor(0, 1);
lcd.print("Bad Air");
Serial.println("Bad Air");
delay(4000);
lcd.clear();
}

if(gasValue > 1200){
//Blynk.email("shameer50@gmail.com", "Alert", "Bad Air!");
Blynk.logEvent("pollution_alert","Bad Air");
}
}
- Upload the program to the XIAO ESP32C6 board using the arrow button.
- Ensure successful upload of the program.
8. Setting Up the Blynk Mobile Dashboard
- Download the Blynk IoT app from the Play Store.
- Open the app and select the template you created.
- Add Gauge Widgets:
- First Gauge: Data Stream – Temperature, customize title.
- Second Gauge: Data Stream – Humidity, customize title.
- Third Gauge: Data Stream – Air Quality, customize title.
- Save and go back to the main dashboard.
9. Check Output
- Monitor the dashboard for real-time data on temperature, humidity, and air quality.
- Receive notifications if the air quality exceeds predefined limits.
Conclusion:
By following this guide, you have successfully set up an air quality monitoring system project using the XIAO ESP32C6 board and Blynk IoT platform. This system will help you keep track of environmental conditions like temperature, humidity and AQI, alert you to poor air quality, ensuring a healthier living environment.